第八章、资源操作Resources
1、概述
1、概念
Java的标准java.net.URL类和各种URL前缀的标准处理程序无法满足所有对low-level资源的访问,比如:没有标准化的 URL 实现可用于访问需要从类路径或相对于 ServletContext 获取的资源。并且缺少某些Spring所需要的功能,例如检测某资源是否存在等。**而Spring的Resource声明了访问low-level资源的能力。
2、Resource的接口
1、内容:Spring 的 Resource 接口位于 org.springframework.core.io 中。 旨在成为一个更强大的接口,用于抽象对低级资源的访问。以下显示了Resource接口定义的方法
2、结构
public interface Resource extends InputStreamSource {

    boolean exists();

    boolean isReadable();

    boolean isOpen();

    boolean isFile();

    URL getURL() throws IOException;

    URI getURI() throws IOException;

    File getFile() throws IOException;

    ReadableByteChannel readableChannel() throws IOException;

    long contentLength() throws IOException;

    long lastModified() throws IOException;

    Resource createRelative(String relativePath) throws IOException;

    String getFilename();

    String getDescription();
}
3、Resource接口继承了InputStreamSource接口,提供了很多InputStreamSource所没有的方法。InputStreamSource接口,只有一个方法:
public interface InputStreamSource {

    InputStream getInputStream() throws IOException;

}
4、重要的方法
| 方法 | 作用 |
|---|---|
| getInputStream() | 找到并打开资源,返回一个InputStream以从资源中读取,预计每次调用都会返回一个新的InputStream(),调用者有责任关闭每个流 |
| exists() | 返回一个布尔值,表明某个资源是否以物理形式存在 |
| isOpen() | 返回一个布尔值,指示此资源是否具有开发流的句柄。如果true,InputStream就不能够多次读取,只能读取一次并且及时关闭以避免内存泄漏。对于所有常规资源实现,返回false,但是InputStreamResource除外 |
| getDescription() | 返回资源的描述,用来输出错误的日志,这通常是完全限定的文件名或资源的实际URL |
5、其他方法
| 方法 | 作用 |
|---|---|
| isReadable() | 表名资源的目录读取 |
| isFile() | 表明这个资源是否代表了一个文件系统的文件 |
| getURL() | 返回一个URL句柄,如果资源不能够被解析URL,将抛出IOException |
| getURI() | 返回一个资源的URI句柄 |
| getFile() | 返回某个文件,如果资源不能碑额解析成为绝对路径,则会抛出FileNotFoundException异常 |
| lastModified() | 资源最后一次修改的时间戳 |
| createRelative() | 创建此资源的相关资源 |
| getFilename() | 资源的文件名是什么 |
3、Resource的实现类
1、内容
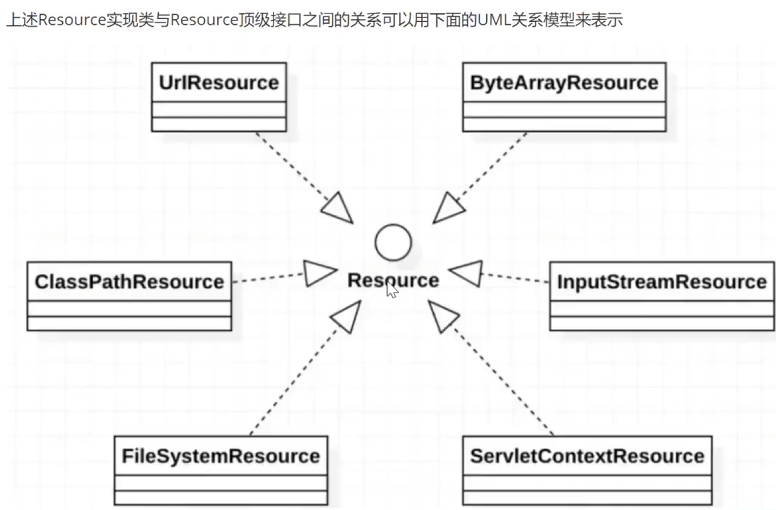
Resource 接口是 Spring 资源访问策略的抽象,它本身并不提供任何资源访问实现,具体的资源访问由该接口的实现类完成——每个实现类代表一种资源访问策略。Resource一般包括这些实现类:UrlResource、ClassPathResource、FileSystemResource、ServletContextResource、InputStreamResource、ByteArrayResource
2、URIResource访问网络资源
1、内容
1、Resource的实现类,用来访问网络资源,支持URL的绝对路径
2、file: ------该前缀用于从文件系统中读取资源
3、http:------该前缀用于访问基于HTTP协议的网络资源。
4、(了解)ftp:------该前缀用于访问基于FTP协议的网络资源
2、实验
1、创建一个maven子模块spring6-resources
2、创建UrlResourceDemo.java
package com.atqt.spring6.resources;

import org.springframework.core.io.UrlResource;

public class UrlResourceDemo {
    public static void main(String[] args) {
//        http前缀
        loadUrlResource("http://www.baidu.com");
//        file前缀
        loadUrlResource("file:atqt.txt");
    }

//    访问前缀http、file
    public static void loadUrlResource(String path){
//        创建Resource实现类的对象UrlResource
        try {
            UrlResource url = new UrlResource(path);
//            获取输出信息
            System.out.println(url.getFilename());
            System.out.println(url.getURI());
            System.out.println(url.getDescription());
            System.out.println(url.getInputStream().read());
        }catch (Exception e){
            e.printStackTrace();
        }
    }
}
3、其中文件一定要在跟目录下
3、ClassPathResource访问类路径下资源
1、内容
1、ClassPathResource 用来访问类加载路径下的资源,相对于其他的 Resource 实现类,其主要优势是方便访问类加载路径里的资源,尤其对于 Web 应用,ClassPathResource 可自动搜索位于 classes 下的资源文件,无须使用绝对路径访问
2、实验:在路径下创建文件atqt.txt,使用ClassPathResource访问
1、就是在相对resources文件夹中准备一个文件,使用ClassPathResource去读取
2、创建ClassPathResourceDemo类
package com.atqt.spring6.resources;

import org.springframework.core.io.ClassPathResource;

import java.io.IOException;
import java.io.InputStream;

//访问类路径下的资源
public class ClassPathResourceDemo {
    public static void main(String[] args) {
        loadClassPathResource("atqt.txt");
    }

    public static void loadClassPathResource(String  path){
//        创建对象ClassPathResource
        ClassPathResource resource = new ClassPathResource(path);
        System.out.println(resource.getFilename());
        System.out.println(resource.getDescription());
//        获取文件的内容
        InputStream in = null;
        try {
            in = resource.getInputStream();
            byte [] b = new byte[1024];
            while(in.read(b)!=-1){
                System.out.println(new String(b));
            }
        } catch (IOException e) {
            throw new RuntimeException(e);
        }

    }
}
3、准备atqt.txt文件
12312312312312
atqt
4、FileSystemResource 访问文件系统资源
1、内容
1、Spring 提供的 FileSystemResource 类用于访问文件系统资源,使用 FileSystemResource 来访问文件系统资源并没有太大的优势,因为 Java 提供的 File 类也可用于访问文件系统资源。
2、实验:使用FileSystemResource 访问文件系统资源
1、创建FileSystemResource.java类
package com.atqt.spring6.resources;

import org.springframework.core.io.FileSystemResource;

import java.io.IOException;
import java.io.InputStream;

public class FileSystemResourceDemo
 {
    public static void main(String[] args) throws Exception {
        String path = "atqt.txt";
        loadFileResource(path);
    }
    public static void loadFileResource(String path) throws Exception {
//        创建对象
        FileSystemResource resource = new FileSystemResource(path);
        System.out.println(resource.getFilename());
        System.out.println(resource.getDescription());

        InputStream in = resource.getInputStream();
        byte[] b = new byte[1024];
        while(in.read(b)!=-1){
            System.out.println(new String(b));
        }
    }

}
2、注意:FileSystemResource实例可使用FileSystemResource构造器显示地创建,但更多的时候它都是隐式创建。执行Spring的某个方法时,该方法接受一个代表资源路径的字符串参数,当Spring识别该字符串参数中包含file:前缀后,系统将会自动创建FileSystemResource对象。
5、ServletContextResource
1、内容
1、这是ServletContext资源的Resource实现,它解释相关Web应用程序根目录中的相对路径。它始终支持流(stream)访问和URL访问,但只有在扩展Web应用程序存档且资源实际位于文件系统上时才允许java.io.File访问。无论它是在文件系统上扩展还是直接从JAR或其他地方(如数据库)访问,实际上都依赖于Servlet容器。
6、InputStreamResource
1、内容
1、InputStreamResource 是给定的输入流(InputStream)的Resource实现。它的使用场景在没有特定的资源实现的时候使用(感觉和@Component 的适用场景很相似)。与其他Resource实现相比,这是已打开资源的描述符。 因此,它的isOpen()方法返回true。如果需要将资源描述符保留在某处或者需要多次读取流,请不要使用它。
7、ByteArrayResource
1、内容
字节数组的Resource实现类。通过给定的数组创建了一个ByteArrayInputStream。它对于从任何给定的字节数组加载内容非常有用,而无需求助于单次使用的InputStreamResource。
8、Resource类图
1、继承图(模型)
4、ResourceLoader接口
1、概述
1、两个标志性接口
1、ResourceLoader
1、该接口实现类的实例可以获得一个Resource实例
2、ResourceLoaderAware
1、该接口将获得一个ResourceLoader的引用
2、ResourceLoader中接口有的方法Resource getResource(String location)
1、作用:该接口仅有这个方法,用于返回一个Resource实例。
2、ApplicationContext实现类都实现ResourceLoader接口,因此ApplicationContext可直接获取Resource实例。
2、ResourceLoader总结
1、Spring将采用和ApplicationContext相同的策略来访问资源。也就是说,如果ApplicationContext是FileSystemXmlApplicationContext,res就是FileSystemResource实例;如果ApplicationContext是ClassPathXmlApplicationContext,res就是ClassPathResource实例
2、当Spring应用需要进行资源访问时,实际上并不需要直接使用Resource实现类,而是调用ResourceLoader实例的getResource()方法来获得资源,ReosurceLoader将会负责选择Reosurce实现类,也就是确定具体的资源访问策略,从而将应用程序和具体的资源访问策略分离开来
3、另外,使用ApplicationContext访问资源时,可通过不同前缀指定强制使用指定的ClassPathResource、FileSystemResource等实现类
4、例子
Resource res = ctx.getResource("calsspath:bean.xml");
Resrouce res = ctx.getResource("file:bean.xml");
Resource res = ctx.getResource("http://localhost:8080/beans.xml");
5、ResourceLoaderAwaare接口
1、介绍
1、获得一个ResourceLoader的引用
2、提供了一个setResourceLoader()方法,该方法将由Spring容器负责调用,Spring容器会将一个ResourceLoader对象作为该方法的参数传入
3、如果把实现ResourceLoaderAware接口的Bean类部署在Spring容器中,Spring容器会将自身当成ResourceLoader作为setResourceLoader()方法的参数传入。由于ApplicationContext的实现类都实现了ResourceLoader接口,Spring容器自身完全可作为ResorceLoader使用。
2、演示ResourceLoaderAware使用
1、实现ResourceLoaderAware的接口
1、创建TestBean.java
package com.atqt.spring6.resources;

import org.springframework.context.ApplicationContext;
import org.springframework.context.support.ClassPathXmlApplicationContext;
import org.springframework.core.io.ResourceLoader;

public class Demo3 {
    public static void main(String[] args) {
//        spring 会将ResouorceLoader对象作为该方法参数传入
        ApplicationContext context = new ClassPathXmlApplicationContext("bean.xml");
        TestBean testBean = context.getBean("testBean", TestBean.class);
//        获取ResourceLoader对象
        ResourceLoader resourceLoader = testBean.getResourceLoader();
        System.out.println(resourceLoader==context);
    }
}
2、创建bean.xml文件,配置TestBean
<?xml version="1.0" encoding="UTF-8"?>
<beans xmlns="http://www.springframework.org/schema/beans"
       xmlns:xsi="http://www.w3.org/2001/XMLSchema-instance"
       xsi:schemaLocation="http://www.springframework.org/schema/beans http://www.springframework.org/schema/beans/spring-beans.xsd">

    <bean id="testBean" class="com.atqt.spring6.resources.TestBean"></bean>
</beans>
3、创建Demom3.java测试类
package com.atqt.spring6.resources;

import org.springframework.context.ApplicationContext;
import org.springframework.context.support.ClassPathXmlApplicationContext;
import org.springframework.core.io.ResourceLoader;

public class Demo3 {
    public static void main(String[] args) {
//        spring 会将ResouorceLoader对象作为该方法参数传入
        ApplicationContext context = new ClassPathXmlApplicationContext("bean.xml");
        TestBean testBean = context.getBean("testBean", TestBean.class);
//        获取ResourceLoader对象
        ResourceLoader resourceLoader = testBean.getResourceLoader();
        System.out.println(resourceLoader==context);
    }
}
3、使用Resource作为属性
1、问题
1、前面介绍了 Spring 提供的资源访问策略,但这些依赖访问策略要么需要使用 Resource 实现类,要么需要使用 ApplicationContext 来获取资源。实际上,当应用程序中的 Bean 实例需要访问资源时
2、解决方法
1、直接利用依赖注入。从这个意义上来看,Spring 框架不仅充分利用了策略模式来简化资源访问,而且还将策略模式和 IoC 进行充分地结合,最大程度地简化了 Spring 资源访问。
3、总结
归纳起来,如果 Bean 实例需要访问资源,有如下两种解决方案:
1、代码中获取 Resource 实例。
2、使用依赖注入。
4、实验一:让Spring为Bean实例依赖注入资源
1、创建依赖注入的类、定义属性和方法
1、创建ResourceBean.java
package com.atqt.spring6.resources.di;

import org.springframework.core.io.Resource;

public class ResourceBean {
    private Resource resource;

    public Resource getResource() {
        return resource;
    }

    public void setResource(Resource resource) {
        this.resource = resource;
    }

    public void pares(){
        System.out.println(resource.getFilename());
        System.out.println(resource.getDescription());
    }
}
2、创建spring配置文件,配置依赖注入
<?xml version="1.0" encoding="UTF-8"?>
<beans xmlns="http://www.springframework.org/schema/beans"
       xmlns:xsi="http://www.w3.org/2001/XMLSchema-instance"
       xsi:schemaLocation="http://www.springframework.org/schema/beans http://www.springframework.org/schema/beans/spring-beans.xsd">
    <bean id="resourceBean" class="com.atqt.spring6.resources.di.ResourceBean">
<!--        把路径放到配置文件中,就方便文件的修改-->
        <property name="resource" value="classpath:atqt.txt"></property>
    </bean>

</beans>
3、进行测试TestBean.java
package com.atqt.spring6.resources.di;

import org.springframework.context.ApplicationContext;
import org.springframework.context.support.ClassPathXmlApplicationContext;

public class TestBean {
    public static void main(String[] args) {
        ApplicationContext context = new ClassPathXmlApplicationContext("beans.xml");
        ResourceBean resourceBean = context.getBean(ResourceBean.class);
        resourceBean.pares();
    }
}
6、应用程序上下文和资源路径
1、内容
1、不管以怎样的方式创建ApplicationContext实例,都需要为ApplicationContext指定配置文件,Spring允许使用一份或多分XML配置文件。
2、当程序创建ApplicationContext实例时,通常也是以Resource的方式来访问配置文件的,所以ApplicationContext完全支持ClassPathResource、FileSystemResource、ServletContextResource等资源访问方式。
2、ApplicationContext实现类指定访问策略
1、ApplicationContext实现类指定访问策略
| 类 | 方法 |
|---|---|
| ClassPathXMLApplicationContext | 对应使用ClassPathResource进行资源访问 |
| FileSystemXmlApplicationContext | 对应使用FileSystemResource进行资源访问 |
| XmlWebApplicationContext | 对应使用ServletContextResource进行资源访问 |
3、使用前缀指定访问策略
1、实验一:使用classpath前缀使用
1、编写TestDemo.java
package com.atqt.spring6.resources.prefix;

import com.atqt.spring6.resources.di.User;
import org.springframework.context.ApplicationContext;
import org.springframework.context.support.ClassPathXmlApplicationContext;
import org.springframework.core.io.Resource;
public class TestDemo {
    public static void main(String[] args) {
//        平常是没有classpath的,就默认是指定访问类
//        加了classpath可以有多个配置类
        ApplicationContext context = new ClassPathXmlApplicationContext("classpath:bean.xml");
        Resource resource =context.getResource("atqt.txt");
        System.out.println(resource.getDescription());

    }
}
2、实验二:使用classpath通配符使用
1、classpath通配符
1、classpath :前缀提供了加载多个XML配置文件的能力,当使用classpath:前缀来指定XML配置文件时,系统将搜索类加载路径,找到所有与文件名匹配的文件,分别加载文件中的配置定义,最后合并成一个ApplicationContext。
2、当使用classpath * :前缀时,Spring将会搜索类加载路径下所有满足该规则的配置文件。
3、如果不是采用classpath * :前缀,而是改为使用classpath:前缀,Spring则只加载第一个符合条件的XML文件
4、classpath : 前缀仅对ApplicationContext有效。实际情况是,创建ApplicationContext时,分别访问多个配置文件(通过ClassLoader的getResource方法实现)。因此,classpath :前缀不可用于Resource。
2、例子
package com.atqt.spring6.resources.prefix;
import com.atqt.spring6.resources.di.User;
import org.springframework.context.ApplicationContext;
import org.springframework.context.support.ClassPathXmlApplicationContext;
import org.springframework.core.io.Resource;
public class TestDemo {
    public static void main(String[] args) {
//        平常是没有classpath的,就默认是指定访问类
//        加了classpath可以有多个配置类
        ApplicationContext context = new ClassPathXmlApplicationContext("classpath:bean*.xml");
        Resource resource =context.getResource("atqt.txt");
        System.out.println(resource.getDescription());
        User user = context.getBean(User.class);
        System.out.println(user);
    }
}
3、实验三:通配符的其他使用
1、一次性加载多个配置文件的方式
1、指定配置文件时使用通配符
ApplicationContext ctx = new ClassPathXmlApplicationContext("classpath:bean*.xml");2、Spring运行classpath*:前缀和通配符结合使用:
ApplicationContext ctx = new ClassPathXmlApplicationContext("classpath*:bean*.xml");