三、SpringBoot3整合SpringMVC
1、怎么实现
步骤
- 导入依赖
- 配置启动类
- 创建实体类
- 测试
1、导入依赖
1、pom.xml依赖
<?xml version="1.0" encoding="UTF-8"?>

<project xmlns="http://maven.apache.org/POM/4.0.0" xmlns:xsi="http://www.w3.org/2001/XMLSchema-instance" xsi:schemaLocation="http://maven.apache.org/POM/4.0.0 http://maven.apache.org/xsd/maven-4.0.0.xsd">
  <modelVersion>4.0.0</modelVersion>
  <groupId>com.atguigu</groupId>
  <artifactId>springboot-base-springmvc-03</artifactId>
  <version>1.0-SNAPSHOT</version>
  <packaging>war</packaging>

  <parent>
    <!--        springboot-->
    <groupId>org.springframework.boot</groupId>
    <artifactId>spring-boot-starter-parent</artifactId>
    <version>3.0.5</version>
  </parent>

  <dependencies>
    <!--web开发的场景启动器-->
    <dependency>
      <groupId>org.springframework.boot</groupId>
      <artifactId>spring-boot-starter-web</artifactId>
    </dependency>
    <!--lombook的依赖-->
    <dependency>
      <groupId>org.projectlombok</groupId>
      <artifactId>lombok</artifactId>
      <version>1.18.30</version>
    </dependency>
  </dependencies>
</project>
2、创建启动类
1、@SpringBootApplication注解
1、这个就是用来弄启动类的注解
2、需要SpringApplication.run(xxxx.class, args);
3、实现
package com.atguigu;

import org.springframework.boot.SpringApplication;
import org.springframework.boot.autoconfigure.SpringBootApplication;

@SpringBootApplication
public class Main {
    public static void main(String[] args) {
        SpringApplication.run(Main.class, args);
        // 启动项目
    }

}
3、创建实体类
1、这个实体类根据业务所需来。根据数据库来
2、用lombom中的@Data注解
4、创建controller
1、controller和之前写的一样
- @RestController
- @RequestMapping()
- 具体实现方法
2、Web相关配置
1、5个重要参数
1、在这个文件中:resources/application.yml
2、参数
- server.port: 指定应用程序的HTTP服务器端口号。
- 默认情况下,Spring Boot使用8080作为默认端口。
- 您可以通过在配置文件中设置server.port来更改端口号。
- server.servlet.context-path: 设置应用程序的上下文路径。
- 这是应用程序在URL中的基本路径。
- 默认情况下,上下文路径为空。
- 您可以通过在配置文件中设置server.servlet.context-path属性来指定自定义的上下文路径。
- spring.mvc.view.prefix 和 spring.mvc.view.suffix: 这两个属性用于配置视图解析器的前缀和后缀。
- 视图解析器用于解析控制器返回的视图名称,并将其映射到实际的视图页面。
- spring.mvc.view.prefix定义视图的前缀
- spring.mvc.view.suffix定义视图的后缀。
- spring.resources.static-locations: 配置静态资源的位置。
- 静态资源可以是CSS、JavaScript、图像等。默认情况下,Spring Boot会将静态资源放在classpath:/static目录下。
- 您可以通过在配置文件中设置spring.resources.static-locations属性来自定义静态资源的位置。
- spring.http.encoding.charset和spring.http.encoding.enabled: 这两个属性用于配置HTTP请求和响应的字符编码。
- spring.http.encoding.charset定义字符编码的名称(例如UTF-8)
- spring.http.encoding.enabled用于启用或禁用字符编码的自动配置。
3、例子
# web相关的配置
# https://docs.spring.io/spring-boot/docs/current/reference/html/application-properties.html#appendix.application-properties.server
server:
  # 端口号设置
  port: 80
  # 项目根路径
  servlet:
    context-path: /boot
3、静态资源处理
1、需求
1、现在使用Spring Boot做开发 , 项目中没有webapp目录 , 我们的项目是一个jar工程,那么就没有webapp,我们的静态资源该放哪里呢?
2、路径
1、默认路径
1、默认的静态资源路径为:
-
· classpath:/META-INF/resources/
-
· classpath:/resources/
-
· classpath:/static/
-
· classpath:/public/
2、我们只要静态资源放在这些目录中任何一个,SpringMVC都会帮我们处理。 我们习惯会把静态资源放在classpath:/static/ 目录下。在resources目录下创建index.html文件
3、spring源码
package org.springframework.boot.autoconfigure.web;
//..................
public static class Resources {
        private static final String[] CLASSPATH_RESOURCE_LOCATIONS = new String[]{"classpath:/META-INF/resources/", "classpath:/resources/", "classpath:/static/", "classpath:/public/"};
        private String[] staticLocations;
        private boolean addMappings;
        private boolean customized;
        private final Chain chain;
        private final Cache cache;

        public Resources() {
            this.staticLocations = CLASSPATH_RESOURCE_LOCATIONS;
            this.addMappings = true;
            this.customized = false;
            this.chain = new Chain();
            this.cache = new Cache();
        }
//...........
4、例子

2、覆盖路径
1、就是去yaml中的Web相关配置化总进行设置
2、spring.resources.static-locations: 配置静态资源的位置。
3、例子
# web相关的配置
# https://docs.spring.io/spring-boot/docs/current/reference/html/application-properties.html#appendix.application-properties.server
server:
  # 端口号设置
  port: 80
  # 项目根路径
  servlet:
    context-path: /boot
spring:
  web:
    resources:
      # 配置静态资源地址,如果设置,会覆盖默认值
      static-locations: classpath:/webapp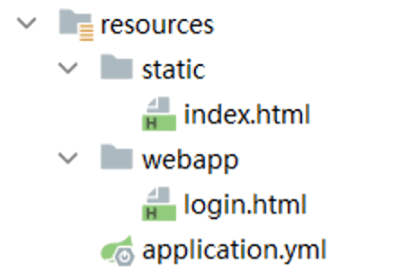
4、自定义拦截器(SpringMvc配置)
1、配置说明
1、只要保证该配置在启动类的同包或者子包方可生效!
2、WebMvcConfig.java
package com.atguigu.config;

import com.atguigu.interceptor.MyInterceptor;
import org.springframework.beans.factory.annotation.Autowired;
import org.springframework.context.annotation.Configuration;
import org.springframework.web.servlet.config.annotation.InterceptorRegistry;
import org.springframework.web.servlet.config.annotation.WebMvcConfigurer;

@Configuration
public class MvcConfig implements WebMvcConfigurer {

    @Autowired
    private MyInterceptor myInterceptor ;

    /**
     * /**  拦截当前目录及子目录下的所有路径 /user/**   /user/findAll  /user/order/findAll
     * /*   拦截当前目录下的以及子路径   /user/*     /user/findAll
     * @param registry
     */
    @Override
    public void addInterceptors(InterceptorRegistry registry) {
        registry.addInterceptor(myInterceptor).addPathPatterns("/**");
    }
}
2、拦截器声明
1、声明拦截器
package com.atguigu.interceptor;

import jakarta.servlet.http.HttpServletRequest;
import jakarta.servlet.http.HttpServletResponse;
import org.springframework.stereotype.Component;
import org.springframework.web.servlet.HandlerInterceptor;
import org.springframework.web.servlet.ModelAndView;

@Component
public class MyInterceptor implements HandlerInterceptor {
    @Override
    public boolean preHandle(HttpServletRequest request, HttpServletResponse response, Object handler) throws Exception {
        System.out.println("MyInterceptor拦截器的preHandle方法执行....");
        return true;
    }

    @Override
    public void postHandle(HttpServletRequest request, HttpServletResponse response, Object handler, ModelAndView modelAndView) throws Exception {
        System.out.println("MyInterceptor拦截器的postHandle方法执行....");
    }

    @Override
    public void afterCompletion(HttpServletRequest request, HttpServletResponse response, Object handler, Exception ex) throws Exception {
        System.out.println("MyInterceptor拦截器的afterCompletion方法执行....");
    }
}