第四章、Vue中的AJAX
1、使用vue脚手架解决ajax跨域问题(配置代理)
1、方法一
1、在vue中的vue.config.js文件配置如下
devServer:{
  proxy:"http://localhost:5000"//代理服务器
}
2、注意
1、优点
1、配置简单,请求资源时直接发给前端(8080)即可。
2、缺点
1、不能配置多个代理,不能灵活的控制请求是否走代理。
3、工作方式
1、工作方式:若按照上述配置代理,当请求了前端不存在的资源时,那么该请求会转发给服务器 (优先匹配前端资源)
3、例子
const { defineConfig } = require('@vue/cli-service')
module.exports = defineConfig({
  transpileDependencies: true,
  方式一
  // 开启代理服务器
  devServer:{
    // 把请求转发的东西
    proxy:'http://localhost:5000'
  }

})
2、方法二
1、在vue中的vue.config.js文件配置如下
module.exports = {
    devServer: {
      proxy: {
      '/api1': {// 匹配所有以 '/api1'开头的请求路径
        target: 'http://localhost:5000',// 代理目标的基础路径
        changeOrigin: true,
        pathRewrite: {'^/api1': ''}
      },
      '/api2': {// 匹配所有以 '/api2'开头的请求路径
        target: 'http://localhost:5001',// 代理目标的基础路径
        changeOrigin: true,
        pathRewrite: {'^/api2': ''}
      }
    }
  }
}
/*
   changeOrigin设置为true时,服务器收到的请求头中的host为:localhost:5000
   changeOrigin设置为false时,服务器收到的请求头中的host为:localhost:8080
   changeOrigin默认值为true
*/
2、注意
1、优点
1、可以配置多个代理,且可以灵活的控制请求是否走代理。
2、缺点
1、配置略微繁琐,请求资源时必须加前缀。
3、例子
const { defineConfig } = require('@vue/cli-service')
module.exports = defineConfig({
  transpileDependencies: true,
  devServer:{
    proxy:{
      // api是请求前缀
      '/atguigu':{
        target:'http://localhost:5000',
        pathRewrite:{'^/atguigu':''},
        // 用来支持websocket
        ws:true,
        // 理解:为true,就和资源服务器撒谎 ,为false,就和资源服务器实话实说为8080
        // 用于控制请求头中的host的值
        changeOrigin:true
      },
      '/demo':{
        target:'http://localhost:5001',
        pathRewrite:{'^/demo':''},
        // 用来支持websocket
        ws:true,
        // 理解:为true,就和资源服务器撒谎 ,为false,就和资源服务器实话实说为8080
        // 用于控制请求头中的host的值
        changeOrigin:true
      },
    // '/foo':{
    //   target:'<orther_url>'
    // }
    }
  }

})
3、例子中的App是
<template>
  <div id="app">
    <button @click="getStudents()">获取学生信息</button>
    <button @click="getCars()">获取汽车信息</button>
  </div>
</template>
<script>
  import axios from 'axios'
  export default {
  name: 'App',
  methods:{
    getStudents(){
      axios.get('http://localhost:8080/atguigu/students').then(
        response =>{
          console.log('请求成功了',response.data)
        },
        error =>{
          console.log('请求失败了',error.message)
        }
      )
    },
    getCars(){
      axios.get('http://localhost:8080/demo/cars').then(
        response =>{
          console.log('请求成功了',response.data)
        },
        error =>{
          console.log('请求失败了',error.message)
        }
      )
    }
  }

}
</script>
2、vue-resource
1、这是一个vue 的插件库,且在vue1.x使用广泛,官方不再维护
3、slot插槽
1、场景
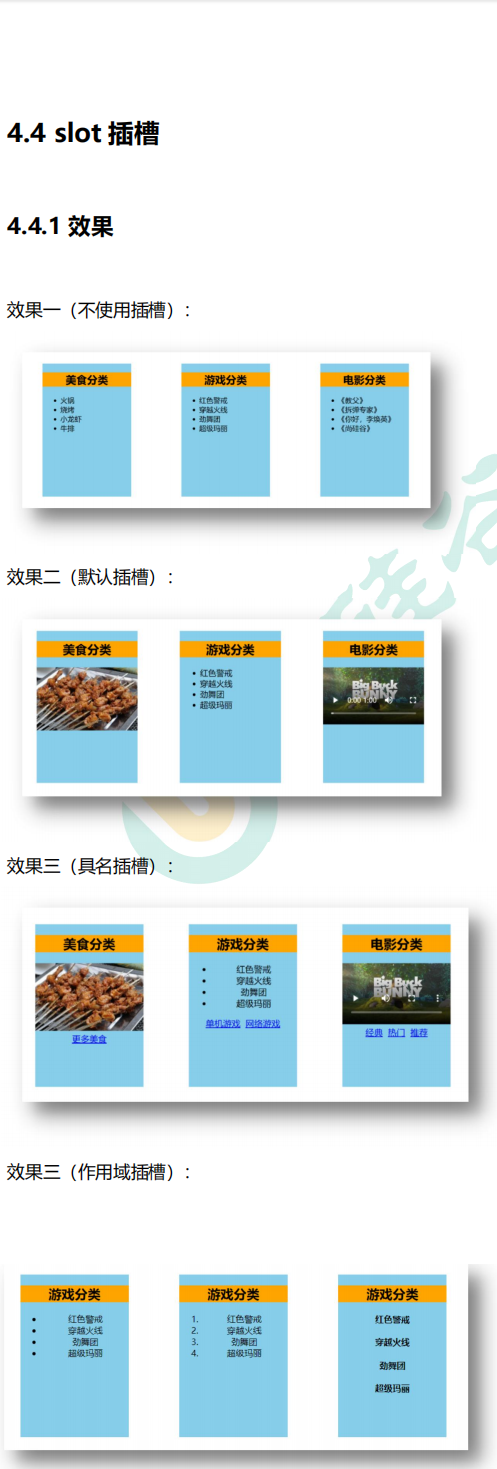
2、概作用
1、作用:让父组件可以向子组件指定位置插入html结构,也是一种组件间通信的方式,适用于 父组件 ===> 子组件 。
2、分类:默认插槽、具名插槽、作用域插槽
3、使用方式
1、默认插槽
父组件中:
        <Category>
           <div>html结构1</div>
        </Category>
子组件中:
        <template>
            <div>
               <!-- 定义插槽 -->
               <slot>插槽默认内容...</slot>
            </div>
        </template>
2、具名插槽
父组件中:
        <Category>
            <template slot="center">
              <div>html结构1</div>
            </template>

            <template v-slot:footer>
               <div>html结构2</div>
            </template>
        </Category>
子组件中:
        <template>
            <div>
               <!-- 定义插槽 -->
               <slot name="center">插槽默认内容...</slot>
               <slot name="footer">插槽默认内容...</slot>
            </div>
        </template>
3、作用域插槽
1、理解:数据在组件的自身,但根据数据生成的结构需要组件的使用者来决定。(games数据在Category组件中,但使用数据所遍历出来的结构由App组件决定)
2、个人理解:就是说你在插件定义的结构在父组件那里,但是插件的使用、数据在子组件那里,所以需要调用slot中就把需要的数据传给父组件中结构里,那里有数据,也方便定义插件的格式。
3、格式
父组件中:
        <Category>
            <template scope="scopeData">
                <!-- 生成的是ul列表 -->
                <ul>
                    <li v-for="g in scopeData.games" :key="g">{{g}}</li>
                </ul>
            </template>
        </Category>

        <Category>
            <template slot-scope="scopeData">
                <!-- 生成的是h4标题 -->
                <h4 v-for="g in scopeData.games" :key="g">{{g}}</h4>
            </template>
        </Category>
子组件中:
        <template>
            <div>
                <slot :games="games"></slot>
            </div>
        </template>

        <script>
            export default {
                name:'Category',
                props:['title'],
                //数据在子组件自身
                data() {
                    return {
                        games:['红色警戒','穿越火线','劲舞团','超级玛丽']
                    }
                },
            }
        </script>