二、Mybatis-Plus核心功能
1、基于Mapper接口的CRUD
1、通用 CRUD 封装BaseMapper (opens new window)接口, Mybatis-Plus 启动时自动解析实体表关系映射转换为 Mybatis 内部对象注入容器! 内部包含常见的单表操作!
1、Insert方法
1、格式
// 插入一条记录
// T 就是要插入的实体对象
// 默认主键生成策略为雪花算法(后面讲解)
int insert(T entity);
2、描述
| 类型 | 参数名 | 描述 |
|---|---|---|
| T | entity | 实体对象 |
2、Delete方法
1、格式
// 根据 entity 条件,删除记录
int delete(@Param(Constants.WRAPPER) Wrapper<T> wrapper);

// 删除(根据ID 批量删除)
int deleteBatchIds(@Param(Constants.COLLECTION) Collection<? extends Serializable> idList);

// 根据 ID 删除
int deleteById(Serializable id);

// 根据 columnMap 条件,删除记录
int deleteByMap(@Param(Constants.COLUMN_MAP) Map<String, Object> columnMap);
2、描述
| 类型 | 参数名 | 描述 |
|---|---|---|
| Wrapper |
wrapper | 实体对象封装操作类(可以为 null) |
| Collection<? extends Serializable> | idList | 主键 ID 列表(不能为 null 以及 empty) |
| Serializable | id | 主键 ID |
| Map<String, Object> | columnMap | 表字段 map 对象 |
3、Update方法
1、格式
// 根据 whereWrapper 条件,更新记录
int update(@Param(Constants.ENTITY) T updateEntity,
            @Param(Constants.WRAPPER) Wrapper<T> whereWrapper);

// 根据 ID 修改  主键属性必须值
int updateById(@Param(Constants.ENTITY) T entity);
2、描述
| 类型 | 参数名 | 描述 |
|---|---|---|
| T | entity | 实体对象 (set 条件值,可为 null) |
| Wrapper |
updateWrapper | 实体对象封装操作类(可以为 null,里面的 entity 用于生成 where 语句) |
4、Select方法
1、格式
// 根据 ID 查询
T selectById(Serializable id);

// 根据 entity 条件,查询一条记录
T selectOne(@Param(Constants.WRAPPER) Wrapper<T> queryWrapper);

// 查询(根据ID 批量查询)
List<T> selectBatchIds(@Param(Constants.COLLECTION) Collection<? extends Serializable> idList);

// 根据 entity 条件,查询全部记录
List<T> selectList(@Param(Constants.WRAPPER) Wrapper<T> queryWrapper);

// 查询(根据 columnMap 条件)
List<T> selectByMap(@Param(Constants.COLUMN_MAP) Map<String, Object> columnMap);

// 根据 Wrapper 条件,查询全部记录
List<Map<String, Object>> selectMaps(@Param(Constants.WRAPPER) Wrapper<T> queryWrapper);

// 根据 Wrapper 条件,查询全部记录。注意: 只返回第一个字段的值
List<Object> selectObjs(@Param(Constants.WRAPPER) Wrapper<T> queryWrapper);

// 根据 entity 条件,查询全部记录(并翻页)
IPage<T> selectPage(IPage<T> page, @Param(Constants.WRAPPER) Wrapper<T> queryWrapper);

// 根据 Wrapper 条件,查询全部记录(并翻页)
IPage<Map<String, Object>> selectMapsPage(IPage<T> page, @Param(Constants.WRAPPER) Wrapper<T> queryWrapper);

// 根据 Wrapper 条件,查询总记录数
Integer selectCount(@Param(Constants.WRAPPER) Wrapper<T> queryWrapper);
2、描述
| 类型 | 参数名 | 描述 |
|---|---|---|
| Serializable | id | 主键 ID |
| Wrapper |
queryWrapper | 实体对象封装操作类(可以为 null) |
| Collection<? extends Serializable> | idList | 主键 ID 列表(不能为 null 以及 empty) |
| Map<String, Object> | columnMap | 表字段 map 对象 |
| IPage |
page | 分页查询条件(可以为 RowBounds.DEFAULT) |
5、自定义和多表映射
1、Mybatis-plus默认的mapper.xml位置
1、默认的位置就是:/mapper/*.xml
2、源码
mybatis-plus: # mybatis-plus的配置
  # 默认位置 private String[] mapperLocations = new String[]{"classpath*:/mapper/**/*.xml"};
  mapper-locations: classpath:/mapper/*.xml
2、自定义的mapper方法
1、就是在mapper接口类中自定义sql查询的方法,然后用mapper.xml自己去写
2、例子【自定义mapper方法】
public interface UserMapper extends BaseMapper<User> {

    //正常自定义方法!
    //可以使用注解@Select或者mapper.xml实现
    List<User> queryAll();
}
3、mapper.xml实现
<?xml version="1.0" encoding="UTF-8" ?>
<!DOCTYPE mapper
        PUBLIC "-//mybatis.org//DTD Mapper 3.0//EN"
        "https://mybatis.org/dtd/mybatis-3-mapper.dtd">
<!-- namespace = 接口的全限定符 -->
<mapper namespace="com.atguigu.mapper.UserMapper">

   <select id="queryAll" resultType="user" >
       select * from user
   </select>
</mapper>
6、例子
1、准备工作和上面的那个快速入门一样
1、步骤
1、创建项目
2、导入依赖
3、编写实体类
4、编写mapper接口
5、编写启动类
6、编写yaml配置文件
7、编写测试方法
2、实现
1、导入依赖
- 这个和上面那个快速入门依赖意义
2、编写实体类
package com.atguigu.pojo;

import lombok.Data;

@Data
public class User {
    private Integer id;
    private String name;
    private  Integer age;
    private String email;
}
3、编写mapper接口
package com.atguigu.mapper;

import com.atguigu.pojo.User;
import com.baomidou.mybatisplus.core.mapper.BaseMapper;

public interface UserMapper extends BaseMapper<User> {
}
4、编写springboot启动类
package com.atguigu;

import org.mybatis.spring.annotation.MapperScan;
import org.springframework.boot.SpringApplication;
import org.springframework.boot.autoconfigure.SpringBootApplication;

@SpringBootApplication
@MapperScan("com.atguigu.mapper")
public class MainApplication {
    public static void main(String[] args) {
        SpringApplication.run(MainApplication.class, args);
    }
}
5、编写yaml配置文件
# 连接池配置
spring:
  datasource:
    type: com.alibaba.druid.pool.DruidDataSource

    url: jdbc:mysql:///manager
    username: root
    password: root
    driver-class-name: com.mysql.cj.jdbc.Driver
mybatis-plus:
  configuration:
    log-impl: org.apache.ibatis.logging.log4j2.Log4j2Impl
6、编写测试方法
package com.atguigu;

import com.atguigu.mapper.UserMapper;
import com.atguigu.pojo.User;
import org.junit.jupiter.api.Test;
import org.springframework.beans.factory.annotation.Autowired;
import org.springframework.boot.test.context.SpringBootTest;

import java.util.ArrayList;
import java.util.HashMap;
import java.util.List;
import java.util.Map;

@SpringBootTest
public class MybatisPlusTest {

    @Autowired
    private UserMapper userMapper;

    @Test
    public void test_insert(){
        User user = new User();
        user.setName("张三");
        user.setAge(3);
        user.setEmail("zhangsan@atguigu.com");
        int result = userMapper.insert(user);
        System.out.println("result:" + result);
        System.out.println("user:" + user);
    }

    @Test
    public void test_delete(){
        //根据id删除
        int row = userMapper.deleteById(1414782978L);

        System.out.println("row = " + row);
//        根据age=20删除
        Map map = new HashMap();
        map.put("age",20);
        int i = userMapper.deleteByMap(map);
        System.out.println("i = " + i);

//        TODO:wrapper条件封装对象,无限的封装条件
    }

//    修改
    @Test
    public void test_update(){
//        TODO:当属性值为null的时候,不修改!
//        user id =1 age 该为30
//        UPDATE user set age =30 where id=1
        User user = new User();
        user.setId(1);
        user.setAge(30);
//        这个是user的执行语句
        int i = userMapper.updateById(user);

//        将所有人的年龄改为22
        User user1 = new User();
        user.setAge(22);
        //这里的null表示条件,如果为null,则表示更新所有数据
        int row = userMapper.update(user,null);
    }

//    查询
    @Test
    public void test_select(){
        User user = userMapper.selectById(1);
        System.out.println("user = " + user);

//        ids集合查询
        List<Long> ids = new ArrayList<>();
        ids.add(1L);
        ids.add(2L);
        List<User> userList = userMapper.selectBatchIds(ids);
        System.out.println("userList = " + userList);

    }
}
2、基于Service接口的CRUD
1、介绍
1、基于Service,更多的是会牵扯到一点业务
2、通用 Service CRUD 封装IService (opens new window)接口,进一步封装 CRUD 采用 get 查询单行 remove 删除 list 查询集合 page 分页 前缀命名方式区分 Mapper 层避免混淆,
3、不会可以查文档
2、对比Mapper接口CRUD区别:
1、Service添加了批量方法
2、Service层的方法自动添加了事务
3、使用Iservice接口方式
1、接口继承IService接口
1、我们自己写的Service接口,继承IService这个接口
- 这里继承了这个接口,相当于只实现了接口中一半的方法,另外一半在实现类中。
- 这是Spring弄的
2、实现
package com.atguigu.service;

import com.atguigu.pojo.User;
import com.baomidou.mybatisplus.extension.service.IService;

//继承这个只实现了一半的方法,另外一半在实现类中
public interface UserService extends IService<User> {
}
2、类继承ServiceImpl实现类
1、就是我们写的ServiceImpl去实现系统的ServiceImpl
- 因为另外一半的实现类就在这个ServiceImpl中
2、实现
package com.atguigu.service.impl;

import com.atguigu.mapper.UserMapper;
import com.atguigu.pojo.User;
import com.atguigu.service.UserService;
import com.baomidou.mybatisplus.extension.service.impl.ServiceImpl;
import org.springframework.stereotype.Service;

//这个就是实现另外一半方法
@Service
public class UserServiceImpl extends ServiceImpl<UserMapper, User> implements UserService {
}
4、CRUD方法
1、这些都是mybatis-plus写好的。我们直接用,会用就行
1、保存(save)
// 插入一条记录(选择字段,策略插入)
boolean save(T entity);
// 插入(批量)
boolean saveBatch(Collection<T> entityList);
// 插入(批量)
boolean saveBatch(Collection<T> entityList, int batchSize);
2、修改或保存(saveOrUpdate)
// TableId 注解存在更新记录,否插入一条记录
boolean saveOrUpdate(T entity);
// 根据updateWrapper尝试更新,否继续执行saveOrUpdate(T)方法
boolean saveOrUpdate(T entity, Wrapper<T> updateWrapper);
// 批量修改插入
boolean saveOrUpdateBatch(Collection<T> entityList);
// 批量修改插入
boolean saveOrUpdateBatch(Collection<T> entityList, int batchSize);
3、移除(remove)
// 根据 queryWrapper 设置的条件,删除记录
boolean remove(Wrapper<T> queryWrapper);
// 根据 ID 删除
boolean removeById(Serializable id);
// 根据 columnMap 条件,删除记录
boolean removeByMap(Map<String, Object> columnMap);
// 删除(根据ID 批量删除)
boolean removeByIds(Collection<? extends Serializable> idList);
4、更新(Update)
// 根据 UpdateWrapper 条件,更新记录 需要设置sqlset
boolean update(Wrapper<T> updateWrapper);
// 根据 whereWrapper 条件,更新记录
boolean update(T updateEntity, Wrapper<T> whereWrapper);
// 根据 ID 选择修改
boolean updateById(T entity);
// 根据ID 批量更新
boolean updateBatchById(Collection<T> entityList);
// 根据ID 批量更新
boolean updateBatchById(Collection<T> entityList, int batchSize);
5、数量(count)
// 查询总记录数
int count();
// 根据 Wrapper 条件,查询总记录数
int count(Wrapper<T> queryWrapper);
6、查询(Select)
// 根据 ID 查询
T getById(Serializable id);
// 根据 Wrapper,查询一条记录。结果集,如果是多个会抛出异常,随机取一条加上限制条件 wrapper.last("LIMIT 1")
T getOne(Wrapper<T> queryWrapper);
// 根据 Wrapper,查询一条记录
T getOne(Wrapper<T> queryWrapper, boolean throwEx);
// 根据 Wrapper,查询一条记录
Map<String, Object> getMap(Wrapper<T> queryWrapper);
// 根据 Wrapper,查询一条记录
<V> V getObj(Wrapper<T> queryWrapper, Function<? super Object, V> mapper);
7、集合(List)
// 查询所有
List<T> list();
// 查询列表
List<T> list(Wrapper<T> queryWrapper);
// 查询(根据ID 批量查询)
Collection<T> listByIds(Collection<? extends Serializable> idList);
// 查询(根据 columnMap 条件)
Collection<T> listByMap(Map<String, Object> columnMap);
// 查询所有列表
List<Map<String, Object>> listMaps();
// 查询列表
List<Map<String, Object>> listMaps(Wrapper<T> queryWrapper);
// 查询全部记录
List<Object> listObjs();
// 查询全部记录
<V> List<V> listObjs(Function<? super Object, V> mapper);
// 根据 Wrapper 条件,查询全部记录
List<Object> listObjs(Wrapper<T> queryWrapper);
// 根据 Wrapper 条件,查询全部记录
<V> List<V> listObjs(Wrapper<T> queryWrapper, Function<? super Object, V> mapper);
5、例子
1、步骤
1、创建项目
2、导入依赖
3、编写实体类
4、编写mapper接口
5、编写Service接口
6、编写ServiceImpl实现类
7、编写启动类
8、编写yaml配置文件
9、编写测试方法
2、实现
1、依赖和上面一样
2、编写实体类
package com.atguigu.pojo;

import lombok.Data;

@Data
public class User {
    private Integer id;
    private String name;
    private  Integer age;
    private String email;
}
3、编写mapper接口
package com.atguigu.mapper;

import com.atguigu.pojo.User;
import com.baomidou.mybatisplus.core.mapper.BaseMapper;

public interface UserMapper extends BaseMapper<User> {
}
4、编写Service接口
package com.atguigu.service;

import com.atguigu.pojo.User;
import com.baomidou.mybatisplus.extension.service.IService;

//继承这个只实现了一半的方法,另外一半在实现类中
public interface UserService extends IService<User> {
}
5、编写ServiceImpl实现类
package com.atguigu.service.impl;

import com.atguigu.mapper.UserMapper;
import com.atguigu.pojo.User;
import com.atguigu.service.UserService;
import com.baomidou.mybatisplus.extension.service.impl.ServiceImpl;
import org.springframework.stereotype.Service;

//这个就是实现另外一半方法
@Service
public class UserServiceImpl extends ServiceImpl<UserMapper, User> implements UserService {
}
6、编写springboot启动类
package com.atguigu;

import org.mybatis.spring.annotation.MapperScan;
import org.springframework.boot.SpringApplication;
import org.springframework.boot.autoconfigure.SpringBootApplication;

@SpringBootApplication
@MapperScan("com.atguigu.mapper")
public class MainApplication {
    public static void main(String[] args) {
        SpringApplication.run(MainApplication.class, args);
    }
}
7、编写yaml配置文件
# 连接池配置
spring:
  datasource:
    type: com.alibaba.druid.pool.DruidDataSource

    url: jdbc:mysql:///manager
    username: root
    password: root
    driver-class-name: com.mysql.cj.jdbc.Driver
mybatis-plus:
  configuration:
    log-impl: org.apache.ibatis.logging.log4j2.Log4j2Impl
8、编写测试类
package com.atguigu;

import com.atguigu.pojo.User;
import com.atguigu.service.UserService;
import org.junit.jupiter.api.Test;
import org.springframework.beans.factory.annotation.Autowired;
import org.springframework.boot.test.context.SpringBootTest;

import java.security.Provider;
import java.util.ArrayList;
import java.util.List;

@SpringBootTest
public class MybatisPlusTest {

    @Autowired
    private UserService service;

    @Test
    public void test_save(){
        List<User> list = new ArrayList<>();
        User user = new User();
        user.setAge(20);
        user.setName("张三");
        user.setEmail("zhangsan@qq.com");
        list.add(user);

        User user1 = new User();
        user1.setAge(21);
        user1.setName("李四");
        user1.setEmail("lisi@qq.com");
        list.add(user1);

        boolean b = service.saveBatch(list);
        System.out.println("b = " + b);
    }

    @Test
    public void test_update(){
        User user = new User();

        user.setName("王五");
        user.setEmail("wangwu@qq.com");
        boolean b = service.saveOrUpdate(user);
        System.out.println("b = " + b);
    }
    @Test
    public void test_delete(){
        boolean b = service.removeById(-1777090559);
        System.out.println("b = " + b);
    }

    @Test
    public void test_select(){
//        get返回单个对象
        User byId =  service.getById(1L);
        System.out.println("byId = " + byId);
//        查询全部,返回的集合
        List<User> list = service.list(null);
        System.out.println("list = " + list);
    }
}
3、分页查询
1、步骤
1、导入分页插件
- 在启动类中写,然后注入ioc容器
2、使用分页插件
3、也可以自定义分页插件
2、实现
1、导入分页插件
@Bean
public MybatisPlusInterceptor mybatisPlusInterceptor() {
    MybatisPlusInterceptor interceptor = new MybatisPlusInterceptor();
    interceptor.addInnerInterceptor(new PaginationInnerInterceptor(DbType.MYSQL));
    return interceptor;
}
2、使用分页插件
package com.atguigu;
import com.atguigu.mapper.UserMapper;
import com.atguigu.pojo.User;
import com.baomidou.mybatisplus.extension.plugins.pagination.Page;
import org.junit.jupiter.api.Test;
import org.springframework.beans.factory.annotation.Autowired;
import org.springframework.boot.test.context.SpringBootTest;

import java.util.List;

@SpringBootTest
public class test {
    @Autowired
    private UserMapper userMapper;
    @Test
    public void testPage(){
//        IPage接口,需要Page实现类【页码,页容量】
        Page<User> page = new Page<>(1,5);
        Page<User> userPage = userMapper.selectPage(page, null);
        System.out.println("userPage = " + userPage);

//        结果page最后也会封装结果
        long current = page.getCurrent();
        System.out.println("当前页码:"+current);
        long size = page.getSize();
        System.out.println("每页显示数:"+size);
        long total = page.getTotal();//总条数
        System.out.println("total = " + total);
        List<User> records = page.getRecords();
        System.out.println("records = " + records);

    }
}
3、自定义分页插件
1、方法
package com.atguigu.mapper;

import com.atguigu.pojo.User;
import com.baomidou.mybatisplus.core.mapper.BaseMapper;
import com.baomidou.mybatisplus.core.metadata.IPage;
import org.apache.ibatis.annotations.Param;

public  interface UserMapper extends  BaseMapper<User> {

    //    定义一个根据年龄参数查询,并且分页的方法 age>xx
    public IPage<User> queryByAge(IPage<User> page, @Param("age") Integer age);
}
2、接口实现xml
<?xml version="1.0" encoding="UTF-8" ?>
<!DOCTYPE mapper
        PUBLIC "-//mybatis.org//DTD Mapper 3.0//EN"
        "https://mybatis.org/dtd/mybatis-3-mapper.dtd">
<!-- namespace等于mapper接口类的全限定名,这样实现对应 -->
<mapper namespace="com.atguigu.mapper.UserMapper">

<!--    方法,写的是查询集合泛型,page的泛型-->
    <select id="queryByAge" resultType="user">
        select * from user where age > #{age}
    </select>
</mapper>
3、进行测试
 @Test
    public void testPage1(){
//        IPage接口,需要Page实现类【页码,页容量】
        Page<User> page = new Page<>(1,5);
        userMapper.queryByAge(page,null);
        Page<User> userPage = userMapper.selectPage(page, null);
        System.out.println("userPage = " + userPage);
//        结果page最后也会封装结果
        long current = page.getCurrent();
        System.out.println("当前页码:"+current);
        long size = page.getSize();
        System.out.println("每页显示数:"+size);
        long total = page.getTotal();//总条数
        System.out.println("total = " + total);
        List<User> records = page.getRecords();
        System.out.println("records = " + records);
    }
4、条件构造器Wrapper
1、作用
1、使用MyBatis-Plus的条件构造器,你可以构建灵活、高效的查询条件,而不需要手动编写复杂的 SQL 语句。
2、它提供了许多方法来支持各种条件操作符,并且可以通过链式调用来组合多个条件。
3、这样可以简化查询的编写过程,并提高开发效率。
4、例子
QueryWrapper<User> queryWrapper = new QueryWrapper<>();
queryWrapper.eq("name", "John"); // 添加等于条件
queryWrapper.ne("age", 30); // 添加不等于条件
queryWrapper.like("email", "@gmail.com"); // 添加模糊匹配条件
等同于:
delete from user where name = "John" and age != 30
                                  and email like "%@gmail.com%"
// 根据 entity 条件,删除记录
int delete(@Param(Constants.WRAPPER) Wrapper<T> wrapper);
2、条件构造器的继承结构
1、结构图
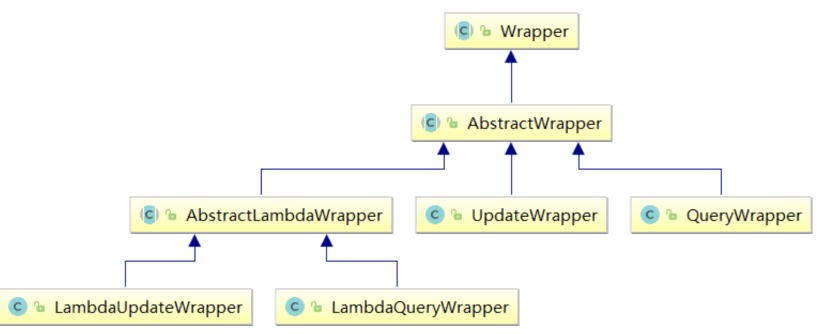
2、Wrapper条件构造抽象类,是顶级父类
3、解释
- AbstractWrapper : 用于查询条件封装,生成 sql 的 where 条件
- QueryWrapper : 查询/删除条件封装
- UpdateWrapper : 修改条件封装
- AbstractLambdaWrapper : 使用Lambda 语法
- LambdaQueryWrapper :用于Lambda语法使用的查询Wrapper
- LambdaUpdateWrapper : Lambda 更新封装Wrapper
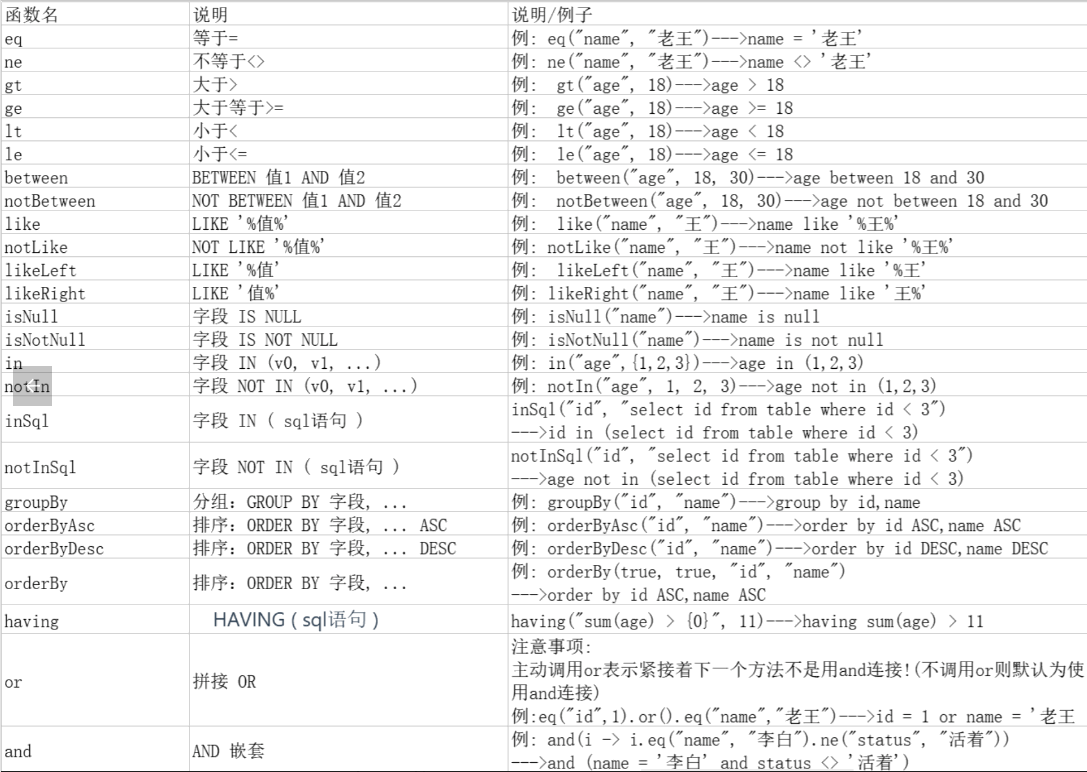
3、基于QueryWrapper组装条件
1、可以在官方文档上查看
2、
3、例子
1、步骤
1、数据库
2、实体类
3、userMapper接口
4、测试方法
2、实现
1、数据库和之前一样
2、实体类
package com.atguigu.pojo;

import com.baomidou.mybatisplus.annotation.TableName;
import lombok.Data;

/**
 * @TableName("user")这个注解可以不加
 *  直接使用实体类的名字作为数据库的表名
 *  忽略大小写
 *  当数据库的表名与实体类命名不同(忽略大小写)使用@TableName()来指定表名
 *  这个是单个修改,万一有很多个实体类需要修改成t_开头呢。
 */

@TableName("user")
@Data
public class User {
    private Integer id;
    private String name;
    private  Integer age;
    private String email;
}
3、UserMapper接口类
package com.atguigu.mapper;

import com.atguigu.pojo.User;
import com.baomidou.mybatisplus.core.mapper.BaseMapper;
import com.baomidou.mybatisplus.core.metadata.IPage;
import org.apache.ibatis.annotations.Param;

public  interface UserMapper extends  BaseMapper<User> {

    //    定义一个根据年龄参数查询,并且分页的方法 age>xx
    public IPage<User> queryByAge(IPage<User> page, @Param("age") Integer age);
}
4、测试方法
package com.atguigu;

import com.atguigu.mapper.UserMapper;
import com.atguigu.pojo.User;
import com.baomidou.mybatisplus.core.conditions.query.QueryWrapper;
import org.junit.jupiter.api.Test;
import org.junit.platform.commons.util.StringUtils;
import org.springframework.beans.factory.annotation.Autowired;
import org.springframework.boot.test.context.SpringBootTest;

import java.util.List;
import java.util.Map;

@SpringBootTest
public class mybatisPlusQueryTest {
    @Autowired
    private UserMapper userMapper;

    @Test
    public void test_01(){
//        查询用户名包含a,年龄在20到30之间,并且邮箱不为空
        QueryWrapper<User> queryWrapper = new QueryWrapper<>();
//        用户名包含a
        queryWrapper.like("name","a");
//        年龄在20到30之间
        queryWrapper.between("age",20,30);
//                邮箱不为空
        queryWrapper.isNotNull("email");

//        链式调用
        queryWrapper.like("name","a").between("age",20,30).isNotNull("email");

        List<User> users = userMapper.selectList(queryWrapper);

        System.out.println("users = " + users);
    }

    @Test
    public void test_02(){
//        按年龄降序查询用户,如果年龄相同则按id升序排列
        QueryWrapper<User> queryWrapper = new QueryWrapper<>();
        queryWrapper.orderByDesc("age").orderByAsc("id");
//        order by age desc ,id asc
        List<User> users = userMapper.selectList(queryWrapper);
        System.out.println("users = " + users);
    }

    @Test
    public void  test_03(){
//        删除email为空的用户
        QueryWrapper<User> queryWrapper = new QueryWrapper<>();
        queryWrapper.isNull("email");
        int delete = userMapper.delete(queryWrapper);
        System.out.println("delete = " + delete);
    }

    @Test
    public void  test_04(){
//        将年龄大于20并且用户中包含有a或邮箱为null的用户信息修改
        User user = new User();
        user.setAge(99);
        user.setName("hhhhhh");

//        设置筛选条件
        QueryWrapper<User> queryWrapper = new QueryWrapper<>();
//        他们之间的条件,默认是and。如果要改成or就需要添加这个方法
        queryWrapper.gt("age",20).like("name","a").or().isNull("email");
        int update = userMapper.update(user, queryWrapper);
        System.out.println("update = " + update);
    }

    @Test
    public void test_05(){
//        查询用户的信息name和age字段,id大于1
        QueryWrapper<User> queryWrapper = new QueryWrapper<>();
        queryWrapper.gt("id",1);
        queryWrapper.select("name","age");
        List<Map<String, Object>> maps = userMapper.selectMaps(queryWrapper);
        System.out.println("maps = " + maps);

    }

    @Test
    public void test_06(){
//        前端传入了两个参数 name age
        String name = "xx";
        Integer age = 10;
        QueryWrapper<User> queryWrapper = new QueryWrapper<>();
//     TODO:   每个方法会有一个boolean condition,允许我们第一个放比较表达式true,整个条件生效。false不生效
//        类似于 if test="条件"
        queryWrapper.eq(StringUtils.isNotBlank(name),"name",name);
        queryWrapper.eq(age!=null && age>18,"age",age);
        List<User> list = userMapper.selectList(queryWrapper);
        System.out.println("list = " + list);
    }
}
4、基于UpdateWrapper组装条件
1、补充
1、注意:使用queryWrapper + 实体类形式可以实现修改,但是无法将列值修改为null值!
2、但是UpdateWrapper可以随意设置列的值
3、格式
UpdateWrapper修改【条件,修改】
    1、直接携带修改数据set("列名","值")
    2、指定任意修改值set("列名",null)
2、实现
package com.atguigu;

import com.atguigu.mapper.UserMapper;
import com.atguigu.pojo.User;
import com.baomidou.mybatisplus.core.conditions.query.QueryWrapper;
import com.baomidou.mybatisplus.core.conditions.update.UpdateWrapper;
import org.apache.ibatis.annotations.Update;
import org.junit.jupiter.api.Test;
import org.springframework.beans.factory.annotation.Autowired;
import org.springframework.boot.test.context.SpringBootTest;

@SpringBootTest
public class MybatisPlusUpdateWrapperTest {

    @Autowired
    private UserMapper userMapper;
    @Test
    public void  test_04(){
//        将年龄大于20并且用户中包含有a或邮箱为null的用户信息修改
        User user = new User();
        user.setAge(99);
        user.setName("hhhhhh");
        user.setEmail("null");

//        设置筛选条件
        QueryWrapper<User> queryWrapper = new QueryWrapper<>();
//        他们之间的条件,默认是and。如果要改成or就需要添加这个方法
        queryWrapper.gt("age",20).like("name","a").or().isNull("email");
        int update = userMapper.update(user, queryWrapper);
        System.out.println("update = " + update);
    }

    @Test
    public void  test_05(){
//        将年龄大于20并且用户中包含有a或邮箱为null的用户信息修改

        /*
        QueryWrapper修改【条件】
            1、要准备需要修改的实体类数据
            2、不能修改为null
         */

        /*
        UpdateWrapper修改【条件,修改】
            1、直接携带修改数据set("列名","值")
            2、指定任意修改值set("列名",null)
         */

//        设置筛选条件
        UpdateWrapper<User> queryWrapper = new UpdateWrapper<>();
//        他们之间的条件,默认是and。如果要改成or就需要添加这个方法
        queryWrapper.gt("age",20)
                .like("name","a")
                .or()
                .isNull("email")
                .set("email",null)
                .set("age",99);
        int update = userMapper.update(null, queryWrapper);
        System.out.println("update = " + update);

    }
}
5、LambdaQueryWrapper组装条件
1、相比于 QueryWrapper,LambdaQueryWrapper 使用了实体类的属性引用(例如 User::getName、User::getAge),
2、而不是字符串来表示字段名,这提高了代码的可读性和可维护性。
3、对比例子
-
QueryWrapper示例代码
-
QueryWrapperqueryWrapper = new QueryWrapper<>(); queryWrapper.eq("name", "John") .ge("age", 18) .orderByDesc("create_time") .last("limit 10"); List userList = userMapper.selectList(queryWrapper); -
LambdaQueryWrapper示例代码
-
LambdaQueryWrapperlambdaQueryWrapper = new LambdaQueryWrapper<>(); lambdaQueryWrapper.eq(User::getName, "John") .ge(User::getAge, 18) .orderByDesc(User::getCreateTime) .last("limit 10"); List userList = userMapper.selectList(lambdaQueryWrapper);
1、lambda表达式回顾
1、介绍
- Lambda 表达式是 Java 8 引入的一种函数式编程特性,它提供了一种更简洁、更直观的方式来表示匿名函数或函数式接口的实现。
- Lambda 表达式可以用于简化代码,提高代码的可读性和可维护性。
2、lambda表达式语法
1、参数列表
- 参数列表用小括号 () 括起来,可以指定零个或多个参数。如果没有参数,可以省略小括号;如果只有一个参数,可以省略小括号。
- 示例:(a, b), x ->, () ->
2、箭头符号:
-
箭头符号 -> 分割参数列表和 Lambda 表达式的主体部分。
-
示例:->
3、Lambda 表达式的主体:
-
Lambda 表达式的主体。如果是一个表达式,可以省略 return 关键字;
-
如果是多条语句的代码块,需要使用大括号
{}括起来,并且需要明确指定 return 关键字。示例:
- 单个表达式:
x -> x * x - 代码块:
(x, y) -> { int sum = x + y; return sum; }
- 单个表达式:
3、具体例子
// 使用 Lambda 表达式实现一个接口的方法
interface Greeting {
    void sayHello();
}

public class LambdaExample {
    public static void main(String[] args) {

        //原始匿名内部类方式
        Greeting greeting = new Greeting() {
            @Override
            public void sayHello(int a) {
                System.out.println("Hello, world!");
            }
        };

        a->System.out.println("Hello, world!")

        // 使用 Lambda 表达式实现接口的方法
        greeting = () -> System.out.println("Hello, world!");

          System.out::println;
           () ->  类.XXX(); -> 类::方法名
        // 调用接口的方法
        greeting.sayHello();
    }
}
2、方法引用
1、介绍
方法引用是 Java 8 中引入的一种语法特性,它提供了一种简洁的方式来直接引用已有的方法或构造函数。方法引用可以替代 Lambda 表达式,使代码更简洁、更易读。
2、格式
- 静态方法引用: 引用静态方法,语法为
类名::静态方法名。 - 实例方法引用: 引用实例方法,语法为
实例对象::实例方法名。 - 对象方法引用: 引用特定对象的实例方法,语法为
类名::实例方法名。 - 构造函数引用: 引用构造函数,语法为
类名::new。
3、例子
@Test
public void testQuick4(){

    String name = "root";
    int    age = 18;

    QueryWrapper<User> queryWrapper = new QueryWrapper<>();
    //每个条件拼接方法都condition参数,这是一个比较运算,为true追加当前条件!
    //eq(condition,列名,值)
    queryWrapper.eq(!StringUtils.isEmpty(name),"name",name)
            .eq(age>1,"age",age);

    //TODO: 使用lambdaQueryWrapper
    LambdaQueryWrapper<User> lambdaQueryWrapper = new LambdaQueryWrapper<>();
    //注意: 需要使用方法引用
    //技巧: 类名::方法名
    lambdaQueryWrapper.eq(!StringUtils.isEmpty(name), User::getName,name);
    List<User> users= userMapper.selectList(lambdaQueryWrapper);
    System.out.println(users);
}
6、LambdaUpdateWrapper组装条件
1、内容
/*
QueryWrapper修改【条件】
    1、要准备需要修改的实体类数据
    2、不能修改为null
 */

/*
UpdateWrapper修改【条件,修改】
    1、直接携带修改数据set("列名","值")
    2、指定任意修改值set("列名",null)
 */
2、格式【例子】
1、直接测试方法。其他的和上面一样,是一个项目里的
package com.atguigu;

import com.atguigu.mapper.UserMapper;
import com.atguigu.pojo.User;
import com.baomidou.mybatisplus.core.conditions.update.LambdaUpdateWrapper;
import com.baomidou.mybatisplus.core.conditions.update.UpdateWrapper;
import org.junit.jupiter.api.Test;
import org.springframework.beans.factory.annotation.Autowired;
import org.springframework.boot.test.context.SpringBootTest;

@SpringBootTest
public class MybatisPlusLambdaUpdateWrapperTest {
    @Autowired
    private UserMapper userMapper;

    @Test
    public void  test_05(){
//        将年龄大于20并且用户中包含有a或邮箱为null的用户信息修改

        /*
        QueryWrapper修改【条件】
            1、要准备需要修改的实体类数据
            2、不能修改为null
         */

        /*
        UpdateWrapper修改【条件,修改】
            1、直接携带修改数据set("列名","值")
            2、指定任意修改值set("列名",null)
         */

//        设置筛选条件,普通方法表达式
        UpdateWrapper<User> queryWrapper = new UpdateWrapper<>();
//        他们之间的条件,默认是and。如果要改成or就需要添加这个方法
        queryWrapper.gt("age",20)
                .like("name","a")
                .or()
                .isNull("email")
                .set("email",null)
                .set("age",99);

//        lambda表达式
        LambdaUpdateWrapper<User> lambdaUpdateWrapper = new LambdaUpdateWrapper<>();
        lambdaUpdateWrapper.gt(User::getAge,20)
                .like(User::getName,"a")
                .or()
                .isNull(User::getEmail)
                .set(User::getEmail,null)
                .set(User::getAge,99);
        int update = userMapper.update(null, queryWrapper);
        System.out.println("update = " + update);
    }
}
5、核心注解使用
1、理解和介绍
1、介绍
- MyBatis-Plus是一个基于MyBatis框架的增强工具,提供了一系列简化和增强的功能,用于加快开发人员在使用MyBatis进行数据库访问时的效率。
2、理解【示例代码】
-
public interface UserMapper extends BaseMapper{ }
3、此接口对应的方法为什么会自动触发 user表的crud呢?
-
默认情况下, 根据指定的<实体类>的名称对应数据库表名,属性名对应数据库的列名!
-
但是不是所有数据库的信息和实体类都完全映射!
-
例如: 表名 t_user → 实体类 User 这时候就不对应了!
4、自定义映射关系就可以使用mybatis-plus提供的注解即可!
2、@TableName注解
1、作用
1、表名注解,标识实体类对应的表
2、就是为了让实体类的类名,和数据库表名对应上
3、使用位置:实体类
4、例子
@TableName("user")
@Data
public class User {
    xxxxx
}5、如果实体类和表名是一样的(忽略大小写)是可以省略的
6、使用全局设置前缀的方式进行处理
-
就是在application.yaml文件中设置
-
设置如下:
-
mybatis-plus:
configuration:
  log-impl: org.apache.ibatis.logging.stdout.StdOutImpl
type-aliases-package: com.atguigu.pojo
global-config:
  db-config:
    table-prefix: t_  #数据库表名的前缀 不用在每个实体类配置
    id-type: assign_id #这个是设置每个表都这样,全局设置
3、@TableId注解
1、作用
1、给数据库设置主键的注解
2、使用位置:实体列主键字段
2、实现
1、单个表修改组件
1、内容属性
| 属性 | 类型 | 必须指定 | 默认值 | 描述 |
|---|---|---|---|---|
| value | String | 否 | "" | 主键字段名 |
| type | Enum | 否 | IdType.NONE | 指定主键类型 |
2、IDType属性可选值
| 值 | 描述 |
|---|---|
| AUTO | 数据库 ID 自增 (mysql配置主键自增长) |
| ASSIGN_ID(默认) | 分配 ID(主键类型为 Number(Long )或 String)(since 3.3.0),使用接口IdentifierGenerator的方法nextId(默认实现类为DefaultIdentifierGenerator雪花算法) |
3、例子
//    从单一表设置,数据主键自增长
    @TableId(type = IdType.AUTO )
    private Integer id;
2、全局配置修改主键
1、实现
mybatis-plus:
  configuration:
    # 配置MyBatis日志
    log-impl: org.apache.ibatis.logging.stdout.StdOutImpl
  global-config:
    db-config:
      # 配置MyBatis-Plus操作表的默认前缀
      table-prefix: t_
      # 配置MyBatis-Plus的主键策略
      id-type: auto
3、什么时候用?
1、实体类的字段与数据库表的主键字段不同名:
- 如果实体类中的字段与数据库表的主键字段不一致,需要使用
@TableId注解来指定实体类中表示主键的字段。
2、主键生成策略不是默认策略:
- 如果需要使用除了默认主键生成策略以外的策略,也需要添加
@TableId注解,并通过value属性指定生成策略。
4、雪花算法
1、使用场景
1、雪花算法(Snowflake Algorithm)是一种用于生成唯一ID的算法。它由Twitter公司提出,用于解决分布式系统中生成全局唯一ID的需求。
2、在传统的自增ID生成方式中,使用单点数据库生成ID会成为系统的瓶颈,而雪花算法通过在分布式系统中生成唯一ID,避免了单点故障和性能瓶颈的问题。
2、组成部分
1、是一个64位的整数
2、时间戳:41位,精确到毫秒级,可以使用69年。
3、节点ID:10位,用于标识分布式系统中的不同节点。
4、序列号:12位,表示在同一毫秒内生成的不同ID的序号。
3、工作方式
- 当前时间戳从某一固定的起始时间开始计算,可以用于计算ID的时间部分。
- 节点ID是分布式系统中每个节点的唯一标识,可以通过配置或自动分配的方式获得。
- 序列号用于记录在同一毫秒内生成的不同ID的序号,从0开始自增,最多支持4096个ID生成。
4、注意
1、雪花算法是一种简单但有效的生成唯一ID的算法,广泛应用于分布式系统中
2、如微服务架构、分布式数据库、分布式锁等场景,以满足全局唯一标识的需求。
3、重点,需要记住:雪花算法生成的数字,需要使用Long 或者 String类型主键!!
4、@TableField注解
1、作用
1、字段注解(非主键)
2、就是给实体类的字段进行注解,怕数据库和实体类的名字不一样
2、属性
| 属性 | 类型 | 必定制定 | 默认值 | 描述 |
|---|---|---|---|---|
| value | String | 否 | "" | 数据库字段名称 |
| exist | boolean | 否 | true | 是否为数据库的字段 |
3、注意
1、MyBatis-Plus会自动开启驼峰命名风格映射!!!