第六章、单一架构案例
1、Maven只是创建项目布置好环境和所有java代码所需的依赖,就没有Maven什么事了
2、要到后期对项目打包,jar的时候才会用到Maven进行打包
6.1、创建工程,引入依赖
6.1.1、架构
1、概念
1、就是项目的结构
2、架构是一个更大的词,形容比较大规模事务的结构(公司的组织结构)
2、单一架构
1、单一架构也叫:all-in-one结构,就是所有代码、配置文件、各种资源都在同一个工程
2、是一个项目包含一个工程
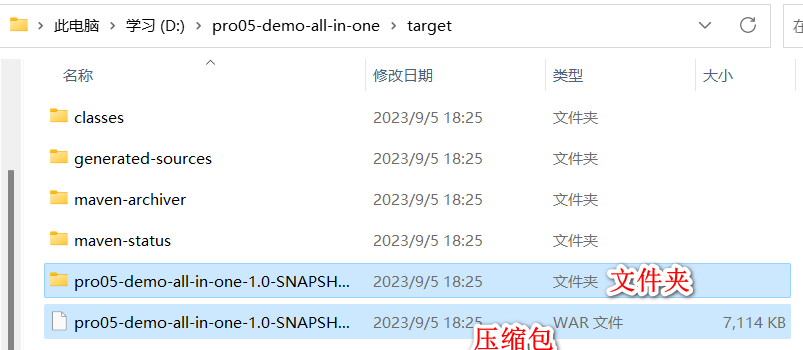
3、导出一个war包
4、放在Tomcat上运行
6.1.2、创建工程
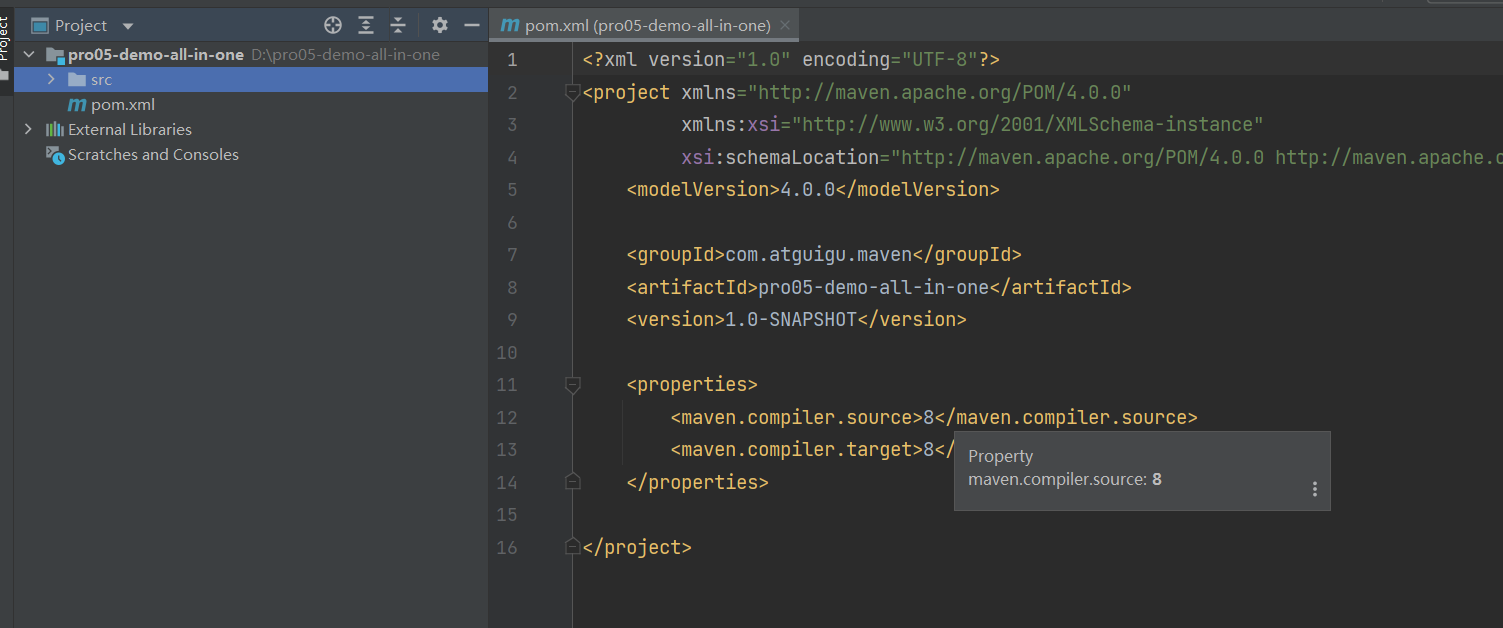
1、完成图示
6.1.3、引入依赖
1、搜索依赖信息的网站
1、去哪找
1、Maven Repository: Search/Browse/Explore (mvnrepository.com)
2、怎么选择
1、确定技术选型
2、确定技术选型、组建依赖列表、项目划分模块....等这些操作都是属于架构设计的范畴
3、项目本身所属行业的基本特点
4、项目具体的功能需求
5、项目预计访问压力程度
6、项目将来拓展的功能性
7、项目总体的体系结构
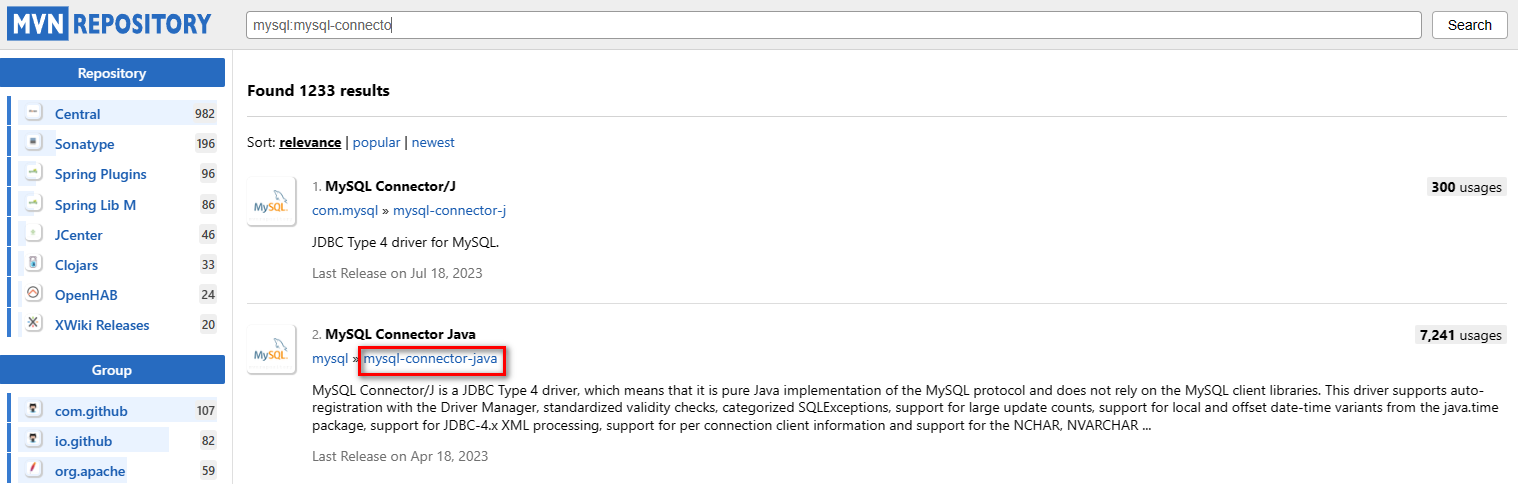
8、具体搜索(以mysql:mysql-connecto为例子)
选择版本
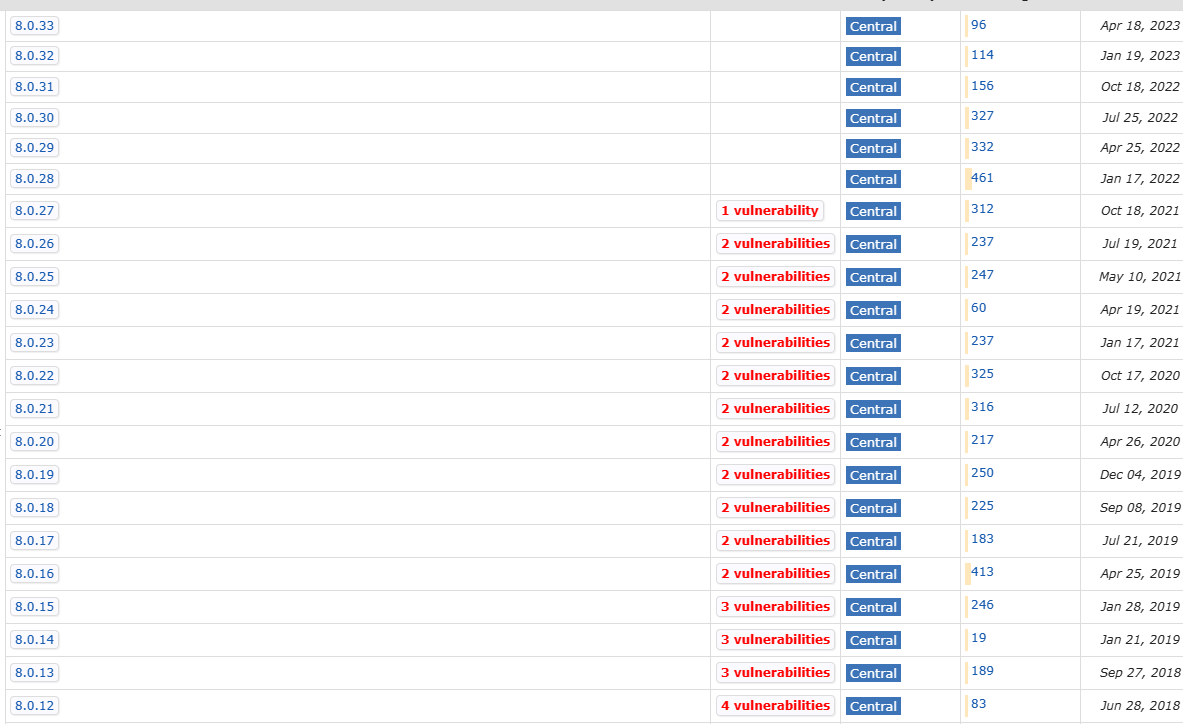
9、考虑因素:是否要求某一版本、如果没有要求,选择高版本或下载量大的版本
2、持久化层所需依赖
- mysql:mysql-connector-java:5.1.37
- com.alibaba:druid:1.2.8
- commons-dbutils:commons-dbutils:1.6
3、表述层所需依赖
- javax.servlet:javax.servlet-api:3.1.0
- org.thymeleaf:thymeleaf:3.0.11.RELEASE
4、辅助功能所需依赖
- junit:junit:4.12
- ch.qos.logback:logback-classic:1.2.3(打印日志的作用)
5、最终完整依赖信息
<!-- https://mvnrepository.com/artifact/mysql/mysql-connector-java -->
<dependency>
    <groupId>mysql</groupId>
    <artifactId>mysql-connector-java</artifactId>
    <version>5.1.37</version>
</dependency>
<!-- https://mvnrepository.com/artifact/com.alibaba/druid -->
<dependency>
    <groupId>com.alibaba</groupId>
    <artifactId>druid</artifactId>
    <version>1.2.8</version>
</dependency>
<!-- https://mvnrepository.com/artifact/commons-dbutils/commons-dbutils -->
<dependency>
    <groupId>commons-dbutils</groupId>
    <artifactId>commons-dbutils</artifactId>
    <version>1.6</version>
</dependency>
<!-- https://mvnrepository.com/artifact/javax.servlet/javax.servlet-api -->
<dependency>
    <groupId>javax.servlet</groupId>
    <artifactId>javax.servlet-api</artifactId>
    <version>3.1.0</version>
    <scope>provided</scope>
</dependency>
<!-- https://mvnrepository.com/artifact/org.thymeleaf/thymeleaf -->
<dependency>
    <groupId>org.thymeleaf</groupId>
    <artifactId>thymeleaf</artifactId>
    <version>3.0.11.RELEASE</version>
</dependency>
<!-- https://mvnrepository.com/artifact/junit/junit -->
<dependency>
    <groupId>junit</groupId>
    <artifactId>junit</artifactId>
    <version>4.12</version>
    <scope>test</scope>
</dependency>
<!-- https://mvnrepository.com/artifact/ch.qos.logback/logback-classic -->
<dependency>
    <groupId>ch.qos.logback</groupId>
    <artifactId>logback-classic</artifactId>
    <version>1.2.3</version>
    <scope>test</scope>
</dependency>
6.1.4、建包
| package 功能 | package 名称 |
|---|---|
| 主包 | com.atguigu.imperial.court |
| 子包[实体类] | com.atguigu.imperial.court.entity |
| 子包[Servlet基类包] | com.atguigu.imperial.court.servlet.base |
| 子包[Servlet模块包] | com.atguigu.imperial.court.servlet.module |
| 子包[Service接口包] | com.atguigu.imperial.court.service.api |
| 子包[Service实现类包] | com.atguigu.imperial.court.service.impl |
| 子包[Dao接口包] | com.atguigu.imperial.court.dao.api |
| 子包[Dao实现类包] | com.atguigu.imperial.court.dao.impl |
| 子包[Filter] | com.atguigu.imperial.court.filter |
| 子包[异常类包] | com.atguigu.imperial.court.exception |
| 子包[工具类] | com.atguigu.imperial.court.util |
| 子包[测试类] | com.atguigu.imperial.court.test |
6.2、搭建环境:持久化层
6.2.1、数据建模
1、物理建模
1、导入数据库信息
create database db_imperial_court;

use db_imperial_court;

create table t_emp
(
    emp_id         int primary key auto_increment,
    emp_name       char(100) not null,
    emp_position   char(100) not null,
    login_account  char(100) not null unique,
    login_password char(100) not null
);

insert into t_emp(emp_name, emp_position, login_account, login_password)
values ('爱新觉罗·玄烨', 'emperor', 'xiaoxuanzi1654', '25325C896624D444B2E241807DCAC98B'), # 16540504
       ('纳兰明珠', 'minister', 'brightball1635', 'A580D0EF93C22036C859E194C14CB777'),   # 16351119
       ('赫舍里·索额图', 'minister', 'tutu1636', 'E40FD7D49B8B7EF46F47407D583C3538'); # 17030921

create table t_memorials
(
    memorials_id          int primary key auto_increment,
    memorials_title       char(100)     not null,
    memorials_content     varchar(5000) not null,
    memorials_emp         int           not null,
    memorials_create_time char(100),
    feedback_time       char(100),
    feedback_content    varchar(1000),
    memorials_status      int           not null
);

insert into t_memorials(memorials_title,
                      memorials_content,
                      memorials_emp,
                      memorials_create_time,
                      feedback_time,
                      feedback_content,
                      memorials_status)
values ('浙江巡抚奏钱塘堤决口疏', '皇上啊,不好啦!钱塘江发大水啦!堤坝冲毁啦!您看这咋弄啊!', 2, '1690-05-07', null, null, 0),
       ('左都御史参鳌拜圈地疏', '皇上啊,鳌拜这厮不是东西呀!占老百姓的地哇!还打人呀!您看咋弄啊!', 3, '1690-04-14', null, null, 0),
       ('都察院劾吴三桂不臣疏', '皇上啊,不得了啦!吴三桂那孙子想造反呀!', 2, '1693-11-18', null, null, 0),
       ('兵部奏准噶尔犯境疏', '皇上啊,不得了啦!葛尔丹要打过来了呀!', 3, '1693-11-18', null, null, 0),
       ('朝鲜使臣朝拜事宜呈皇上御览', '皇上啊!朝鲜国的人要来啦!咱们请他们吃猪肉炖粉条子吧!', 2, '1680-06-11', null, null, 0),
       ('英吉利炮舰购买事宜疏', '皇上啊!英国的小船船咱们买多少啊?', 3, '1680-06-12', null, null, 0),
       ('劾杭州织造贪墨疏', '皇上啊!杭州织造有问题啊!', 2, '1680-06-13', null, null, 0),
       ('禀畅春园落成疏', '皇上啊!畅春园修好了哇!您啥时候过来看看呀!', 3, '1680-06-14', null, null, 0),
       ('请旨木兰秋狝疏', '皇上啊!秋天到啦,又该打猎啦!', 2, '1680-06-15', null, null, 0),
       ('核准西北军饷银两疏', '皇上啊!您看看这钱数算的对不对呀!', 3, '1680-06-16', null, null, 0),
       ('请旨裁撤三藩疏', '皇上啊!咱们不裁撤三藩就芭比Q了哇!', 2, '1680-06-17', null, null, 0),
       ('蒙古王公进京朝拜疏', '皇上啊!蒙古王公要来啦!咱们请他们吃猪肉炖粉条子吧!', 3, '1680-06-18', null, null, 0),
       ('礼部请旨九阿哥赐名疏', '皇上啊!您看九阿哥该叫什么名字呀?', 2, '1680-06-19', null, null, 0),
       ('户部尚书请旨告老还乡疏', '皇上啊!臣想回家养老啦!您看看啥时候给臣把俸禄结一下啊!', 3, '1680-06-20', null, null, 0),
       ('查江宁织造贪墨疏', '皇上啊!江宁织造有问题啊!', 2, '1680-06-21', null, null, 0)
       ;
2、必须要注意中文的字符集是否为utf8
alter table t_emp change emp_name emp_name char(100) character set utf8;2、逻辑建模
1、就是把java类建出来
1、Emp实体类
1、内容
    private Integer empId;
    private String empName;
    private String empPosition;
    private String loginAccount;
    private String loginPassword;
2、Memorials实体类
    private Integer memorialsId;
    private String memorialsTitle;
    private String memorialsContent;

    // 奏折摘要数据库没有,这里是为了配和页面显示
    private String memorialsContentDigest;
    private Integer memorialsEmp;

    // 员工姓名数据库没有,这里是为了配合页面显示
    private String memorialsEmpName;
    private String memorialsCreateTime;
    private String feedbackTime;
    private String feedbackContent;
    private Integer memorialsStatus;
6.2.2、数据库连接信息
1、第一次使用Maven约定目录结构resources目录,存放各种配置文件
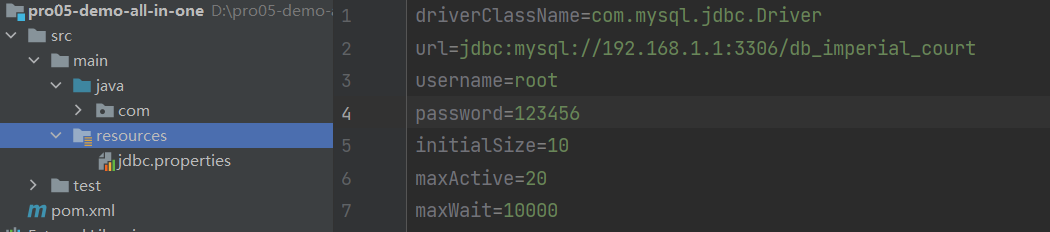
2、jdbc连接代码
driverClassName=com.mysql.jdbc.Driver
url=jdbc:mysql://192.168.1.1:3306/db_imperial_court
username=root
password=123456
initialSize=10
maxActive=20
maxWait=10000
6.2.3、获取数据库连接
1、创建JDBCUtils工具类

2、创建javax.sq.DataSource对象
// 将数据源对象设置为静态属性,保证大对象的单一实例
private static DataSource dataSource;

static {

    // 1.创建一个用于存储外部属性文件信息的Properties对象
    Properties properties = new Properties();

    // 2.使用当前类的类加载器加载外部属性文件:jdbc.properties
    InputStream inputStream = JDBCUtils.class.getClassLoader().getResourceAsStream("jdbc.properties");

    try {

        // 3.将外部属性文件jdbc.properties中的数据加载到properties对象中
        properties.load(inputStream);

        // 4.创建数据源对象
        dataSource = DruidDataSourceFactory.createDataSource(properties);

    } catch (Exception e) {
        e.printStackTrace();
    }

}
3、创建ThreadLocal对象
1、原因
1、因为代码十分冗余
2、每个service都要写下面代码就很麻烦(伪代码)
try{

    // 1、获取数据库连接
    // 重要:要保证参与事务的多个数据库操作(SQL 语句)使用的是同一个数据库连接
    Connection conn = JDBCUtils.getConnection();

    // 2、核心操作
    // ...

    // 3、核心操作成功结束,可以提交事务
    conn.commit();

}catch(Exception e){

    // 4、核心操作抛出异常,必须回滚事务
    conn.rollBack();

}finally{

    // 5、释放数据库连接
    JDBCUtils.releaseConnection(conn);

}
2、步骤
1、在一个方法内控制事务
2、将重复代码抽取到Filter中:内容如下
public void doFilter(ServletRequest request, ServletResponse response, FilterChain chain){

    try{

        // 1、获取数据库连接
        // 重要:要保证参与事务的多个数据库操作(SQL 语句)使用的是同一个数据库连接
        Connection conn = JDBCUtils.getConnection();

        // 重要操作:关闭自动提交功能
        connection.setAutoCommit(false);

        // 2、核心操作:通过 chain 对象放行当前请求
        // 这样就可以保证当前请求覆盖的 Servlet 方法、Service 方法、Dao 方法都在同一个事务中。
        // 同时各个请求都经过这个 Filter,所以当前事务控制的代码在这里只写一遍就行了,
        // 避免了代码的冗余。
        chain.doFilter(request, response);

        // 3、核心操作成功结束,可以提交事务
        conn.commit();

    }catch(Exception e){

        // 4、核心操作抛出异常,必须回滚事务
        conn.rollBack();

    }finally{

        // 5、释放数据库连接
        JDBCUtils.releaseConnection(conn);

    }

}
解释:所谓『当前请求覆盖的 Servlet 方法、Service 方法、Dao 方法』其实就是 chain.doFilter(request, response) 间接调用的方法。
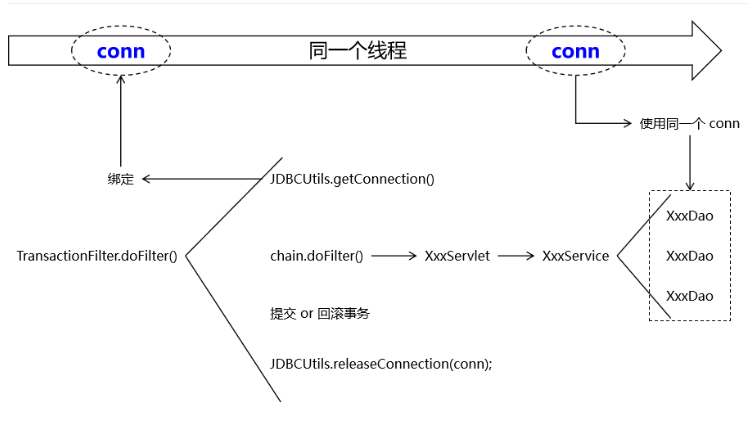
3、数据的夸方法传递
①通过 JDBCUtils 工具类获取到的 Connection 对象需要传递给 Dao 方法,让事务涉及到的所有 Dao 方法用的都是同一个 Connection 对象。
②但是 Connection 对象无法通过 chain.doFilter() 方法以参数的形式传递过去。
③所以从获取到 Connection 对象到使用 Connection 对象中间隔着很多不是我们自己声明的方法——我们无法决定它们的参数。
④图像

4、ThreadLocal对象的功能

1、全类名:java.lang.ThreadLocal
2、泛型 T:要绑定到当前线程的数据的类型
3、具体有三个主要
| 方法名 | 功能 |
|---|---|
| set(T value) | 将数据绑定到当前线程 |
| get() | 从当前线程获取已绑定的数据 |
| remove() | 将数据从当前线程移除 |
1、java代码
// 由于 ThreadLocal 对象需要作为绑定数据时 k-v 对中的 key,所以要保证唯一性
// 加 static 声明为静态资源即可保证唯一性
private static ThreadLocal<Connection> threadLocal = new ThreadLocal<>();
5、获取数据库连接的方法
/**
 * 工具方法:获取数据库连接并返回
 * @return
 */
public static Connection getConnection() {

    Connection connection = null;

    try {
        // 1、尝试从当前线程检查是否存在已经绑定的 Connection 对象
        connection = threadLocal.get();

        // 2、检查 Connection 对象是否为 null
        if (connection == null) {

            // 3、如果为 null,则从数据源获取数据库连接
            connection = dataSource.getConnection();

            // 4、获取到数据库连接后绑定到当前线程
            threadLocal.set(connection);

        }
    } catch (SQLException e) {
        e.printStackTrace();

        // 为了调用工具方法方便,编译时异常不往外抛
        // 为了不掩盖问题,捕获到的编译时异常封装为运行时异常抛出
        throw new RuntimeException(e);
    }

    return connection;
}
6、释放数据库连接的方法
/**
 * 释放数据库连接
 */
public static void releaseConnection(Connection connection) {

    if (connection != null) {

        try {
            // 在数据库连接池中将当前连接对象标记为空闲
            connection.close();

            // 将当前数据库连接从当前线程上移除
            threadLocal.remove();

        } catch (SQLException e) {
            e.printStackTrace();
            throw new RuntimeException(e);
        }

    }

}
7、进行初步测试
1、在Test文件中创建ImperialCourtTest 文件
2、测试代码
public class ImperialCourtTest {

    @Test
    public void testGetConnection() {

        Connection connection = JDBCUtils.getConnection();
        System.out.println("connection = " + connection);

        JDBCUtils.releaseConnection(connection);

    }

}
8、完整代码
package com.atguigu.imperial.court.util;

import com.alibaba.druid.pool.DruidDataSourceFactory;

import javax.sql.DataSource;
import java.io.IOException;
import java.io.InputStream;
import java.sql.Connection;
import java.sql.SQLException;
import java.util.Properties;

/**
 * 实现功能
 *     1、从数据源获取数据库连接
 *     2、从数据库获取到数据源绑定到本地线程(借助ThreadLocal)
 *     3、释放线程时和本地线程解除绑定
 */
public class JDBCUtils {
//    数据源成员变量,设置为静态资源,保证大对象的单例性,同时保证静态方法可以访问
    private static DataSource dataSource;

//    由于ThreadLocal对象需要作为绑定数据时k-v的key,所以要加static保证唯一性
    private  static ThreadLocal<Connection> threadLocal = new ThreadLocal<>();

    //静态代码块中初始化数据源
    static {
        try {
            //思路分析
            //从jdbc.properties文件中读取连接数据库信息
            //为了保证程序代码的可移植性,需要基于一个确定的基准读取文件
            //确定的基准:类路径的 根目录   resources经过构建操作中的打包操作,会放在WEB-INF/classes目录下
            //WEB-INF/classes目录存放编译好的*.class字节码文件,这个目录称之为类路径
            //本地和服务器端都是一个确定的基准

            //具体代码操作
            //1、获取当前类的类加载器
            ClassLoader classLoader = JDBCUtils.class.getClassLoader();
            //2、通过类加载器对象从类路径根目录下读取文件
            InputStream stream = classLoader.getResourceAsStream("jdbc.properties");
            //3、使用properties类封装属性文件中的数据
            Properties properties = new Properties();
            properties.load(stream);

            //4、根据Properties 对象(已经封装了数据库连接信息)来创建数据源对象
            dataSource = DruidDataSourceFactory.createDataSource(properties);
        } catch (Exception e) {
            e.printStackTrace();

//            为了避免真正抛出异常后,catch块捕获到异常从而掩盖问题
//            这里将所捕获的异常封装为运行时异常继续抛出
            throw new RuntimeException(e);
        }
    }

    /**
     *  方法:获取数据库连接并返回
     * @return
     */
    public static Connection getConnection(){
        Connection connection = null;
        try {
//        1、尝试从当前线程检测啥都存在已经绑定的Connection对象
             connection = threadLocal.get();
            //2、检查是否为空
            if(connection==null){
                //3、如果为null,从数据源获取数据库连接
                connection = dataSource.getConnection();
                //4、获取到数据库连接绑定到当前线程
                threadLocal.set(connection);
            }
        } catch (SQLException e) {
            e.printStackTrace();
//            为了调用工具方便,编译时异常不外抛
//            为了不掩盖问题,捕获到编译时异常封装为运行时异常抛出
            throw new RuntimeException(e);
        }
        return connection;
    }

    /**
     * 释放数据库连接
     */
    public static void releaseConnection(Connection connection){
        if (connection!=null){
            try {
                //在数据库连接池中,将当前连接对象标记为空闲
                connection.close();
                //将当前数据库连接从当前线程上移出
                threadLocal.remove();

            } catch (SQLException e) {
                e.printStackTrace();
                throw new RuntimeException(e);
            }
        }
    }
}
1、注意
1、注意properties中的配置文件是否正确
6.2.4、BaseDao
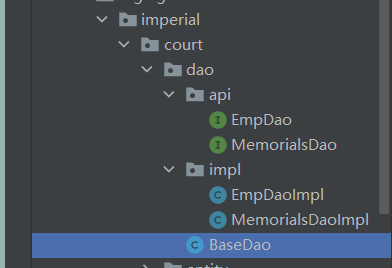
1、创建BaseDao
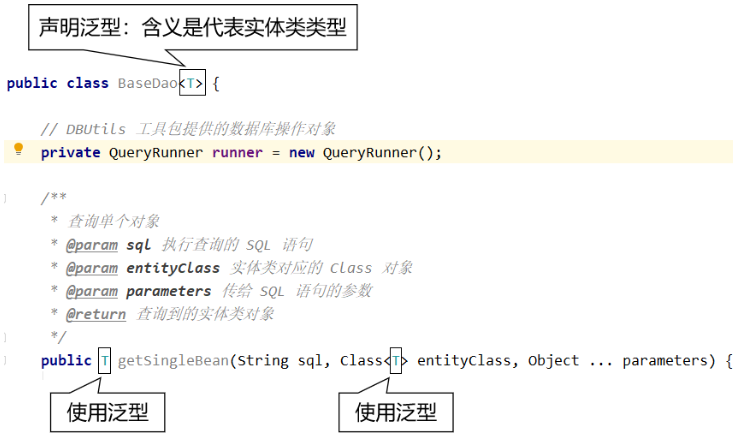
2、泛型的说明
3、创建QueryRunner对象
    // DBUtils 工具包提供的数据库操作对象
    private QueryRunner runner = new QueryRunner();
4.通用的增删改方法
1、特别说明
1、在 BaseDao 方法中获取数据库连接但是不做释放,因为我们要在控制事务的 Filter 中统一释放。
2、代码实现
/**
 * 通用的增删改方法,insert、delete、update 操作都可以用这个方法
 * @param sql 执行操作的 SQL 语句
 * @param parameters SQL 语句的参数
 * @return 受影响的行数
 */
public int update(String sql, Object ... parameters) {

    try {
        Connection connection = JDBCUtils.getConnection();

        int affectedRowNumbers = runner.update(connection, sql, parameters);

        return affectedRowNumbers;
    } catch (SQLException e) {
        e.printStackTrace();

        // 如果真的抛出异常,则将编译时异常封装为运行时异常抛出
        new RuntimeException(e);

        return 0;
    }

}
5、查询功能实现
1、查询单个对象
/**
 * 查询单个对象
 * @param sql 执行查询的 SQL 语句
 * @param entityClass 实体类对应的 Class 对象
 * @param parameters 传给 SQL 语句的参数
 * @return 查询到的实体类对象
 */
public T getSingleBean(String sql, Class<T> entityClass, Object ... parameters) {

    try {
        // 获取数据库连接
        Connection connection = JDBCUtils.getConnection();

        return runner.query(connection, sql, new BeanHandler<>(entityClass), parameters);

    } catch (SQLException e) {
        e.printStackTrace();

        // 如果真的抛出异常,则将编译时异常封装为运行时异常抛出
       throw new RuntimeException(e);
    }

    return null;
}
2、查询多个对象
/**
 * 查询返回多个对象的方法
 * @param sql 执行查询操作的 SQL 语句
 * @param entityClass 实体类的 Class 对象
 * @param parameters SQL 语句的参数
 * @return 查询结果
 */
public List<T> getBeanList(String sql, Class<T> entityClass, Object ... parameters) {
    try {
        // 获取数据库连接
        Connection connection = JDBCUtils.getConnection();

        return runner.query(connection, sql, new BeanListHandler<>(entityClass), parameters);

    } catch (SQLException e) {
        e.printStackTrace();

        // 如果真的抛出异常,则将编译时异常封装为运行时异常抛出
        throw new RuntimeException(e);
    }

    return null;
}
6、测试增删改和查询方法
1、代码实现
    private BaseDao<Emp> baseDao = new BaseDao<>();
    @Test
    public void testGetSingleBean(){
        String sql = "select emp_id empId,emp_name empName,emp_position empPosition,login_account loginAccount,login_password loginPassword from t_emp where emp_id=?";
        Emp emp = baseDao.getSingleBean(sql,Emp.class,1);
        System.out.println(emp);
    }

    @Test
    public void testGetBeanList(){
        String sql = "select emp_id empId,emp_name empName,emp_position empPosition,login_account loginAccount,login_password loginPassword from t_emp ";
        List<Emp> empList = baseDao.getBeanList(sql,Emp.class);

        for(Emp emp:empList){
            System.out.println("emp="+emp);
        }
    }

    @Test
    public void testUpdate(){
        String sql = "update t_emp set emp_position=? where emp_id=?";
        String empPosition = "minister";
        String empId = "3";
        int affectedRowNumbers = baseDao.update(sql,empPosition,empId);
        System.out.println("affectedRowNumbers="+affectedRowNumbers);

    }
6.2.5、子类Dao
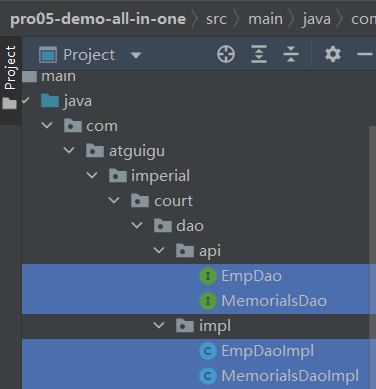
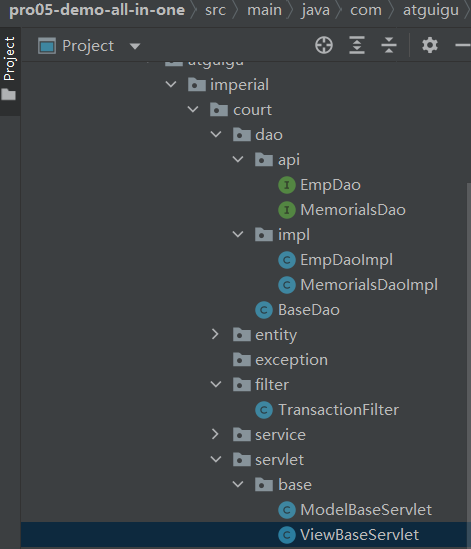
1、创建子类目录(结构)
6.3、环境搭建:事务控制
6.3.1、总体思路
1、思路图
6.3.2、创建Filter类
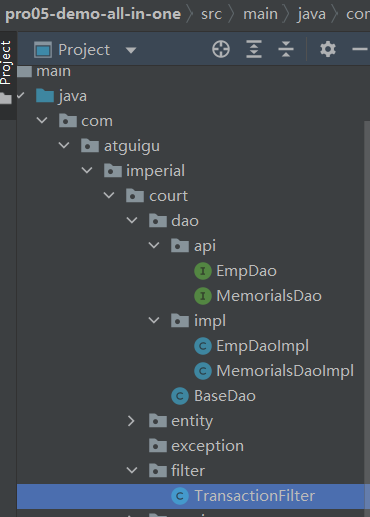
1、创建目录
2、TransactionFilter代码实现
public class TransactionFilter implements Filter {

    // 声明集合保存静态资源扩展名
    private static Set<String> staticResourceExtNameSet;

    static {
        staticResourceExtNameSet = new HashSet<>();
        staticResourceExtNameSet.add(".png");
        staticResourceExtNameSet.add(".jpg");
        staticResourceExtNameSet.add(".css");
        staticResourceExtNameSet.add(".js");
    }

    @Override
    public void doFilter(ServletRequest servletRequest, ServletResponse servletResponse, FilterChain filterChain) throws IOException, ServletException {

        // 前置操作:排除静态资源
        HttpServletRequest request = (HttpServletRequest) servletRequest;
        String servletPath = request.getServletPath();
        if (servletPath.contains(".")) {
            String extName = servletPath.substring(servletPath.lastIndexOf("."));

            if (staticResourceExtNameSet.contains(extName)) {

                // 如果检测到当前请求确实是静态资源,则直接放行,不做事务操作
                filterChain.doFilter(servletRequest, servletResponse);

                // 当前方法立即返回
                return ;
            }

        }

        Connection connection = null;

        try{

            // 1、获取数据库连接
            connection = JDBCUtils.getConnection();

            // 重要操作:关闭自动提交功能
            connection.setAutoCommit(false);

            // 2、核心操作
            filterChain.doFilter(servletRequest, servletResponse);

            // 3、提交事务
            connection.commit();

        }catch (Exception e) {

            try {
                // 4、回滚事务
                connection.rollback();
            } catch (SQLException ex) {
                ex.printStackTrace();
            }

            // 页面显示:将这里捕获到的异常发送到指定页面显示
            // 获取异常信息
            String message = e.getMessage();

            // 将异常信息存入请求域
            request.setAttribute("systemMessage", message);

            // 将请求转发到指定页面
            request.getRequestDispatcher("/").forward(request, servletResponse);

        }finally {

            // 5、释放数据库连接
            JDBCUtils.releaseConnection(connection);

        }

    }

    @Override
    public void init(FilterConfig filterConfig) throws ServletException {}
    @Override
    public void destroy() {}
}
3、配置Web.xml
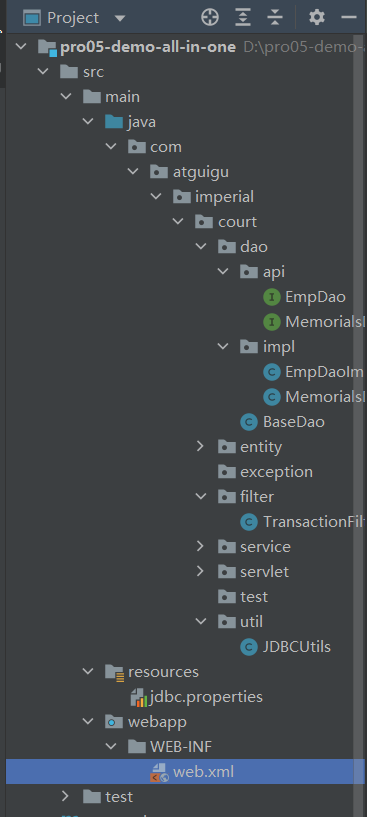
1、注意:需要首先将当前工程改成Web工程
2、代码
<filter>
    <filter-name>txFilter</filter-name>
    <filter-class>com.atguigu.imperial.court.filter.TransactionFilter</filter-class>
</filter>
<filter-mapping>
    <filter-name>txFilter</filter-name>
    <url-pattern>/*</url-pattern>
</filter-mapping>
4、注意点
1、确保异常回滚
1、程序执行过程中,必须让所有catch块把编译时异常转换为运行时异常抛出;如果不这么做,在TransactionFilter中的catch就无法捕获底层抛出的异常,回滚就无法回滚
2、谨防数据库连接提前释放
1、很多操作都使用同一个数据库,中间任何一个环节释放数据库连接都会导致后续操作无法正常完成
6.4、搭建环境:表述层
6.4.1、视图模版Thymeleaf
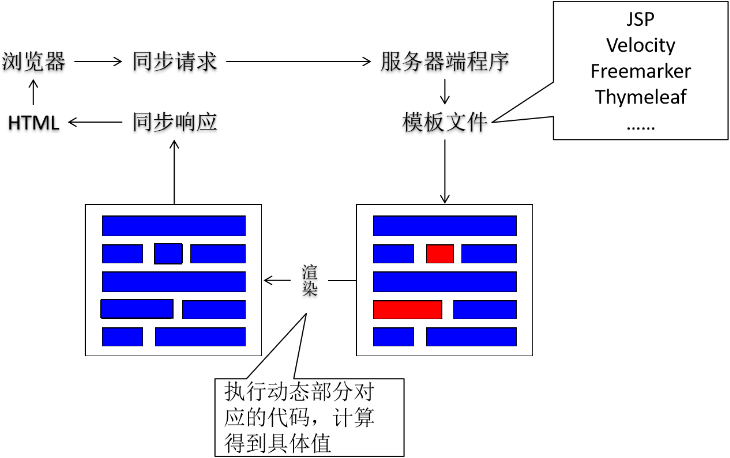
1、服务端渲染
1、在固定内容中可以穿插表达式等形式的动态内容,将视图模板中的动态内容转换为对应的java代码并执行
2、Thymeleaf简要工作机制
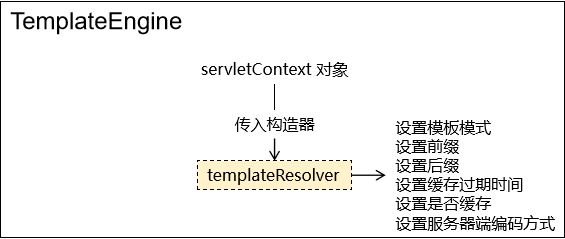
1、初始化阶段
1、因为每次请求处理的网页,都需要渲染,重复太多,就把TemplateEngine对象给单独初始化,增加效率,减少内存消耗
2、目标:创建TemplateEngine对象
3、封装:因为每个请求来说,TemplateEngine对象都是同一个,所以初始化准备好
4、图解
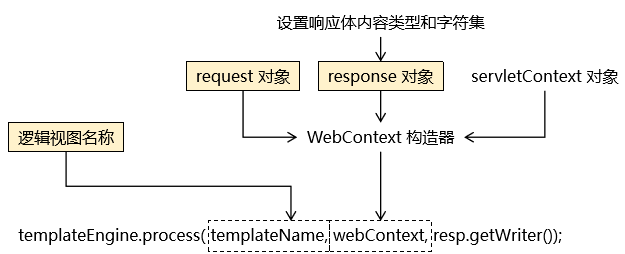
2、请求处理阶段
3、逻辑视图和物理视图
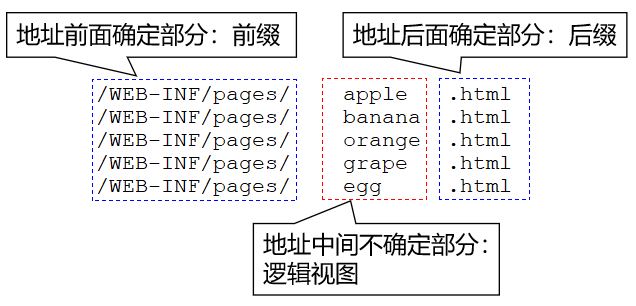
1、内容介绍
1、下列页面地址
/WEB-INF/pages/apple.html
/WEB-INF/pages/banana.html
/WEB-INF/pages/orange.html
/WEB-INF/pages/grape.html
/WEB-INF/pages/egg.html
2、WEB-INF在浏览器下访问不到,需要servlet访问,可以做权限验证等(最佳实践)
3、物理视图:直接访问到页面本身
4、逻辑视图:将物理视图中前面、后面固定的部分抽取出来,让每次请求中间变化部分
5、例子
2、ViewBaseServlet 完整代码
1、为了简化视图页面处理过程,我们将 Thymeleaf 模板引擎的初始化和请求处理过程封装到一个 Servlet 基类中:ViewBaseServlet。以后负责具体模块业务功能的 Servlet 继承该基类即可直接使用。
2、完整代码
public class ViewBaseServlet extends HttpServlet {

    private TemplateEngine templateEngine;

    @Override
    public void init() throws ServletException {

        // 1.获取ServletContext对象
        ServletContext servletContext = this.getServletContext();

        // 2.创建Thymeleaf解析器对象
        ServletContextTemplateResolver templateResolver = new ServletContextTemplateResolver(servletContext);

        // 3.给解析器对象设置参数
        // ①HTML是默认模式,明确设置是为了代码更容易理解
        templateResolver.setTemplateMode(TemplateMode.HTML);

        // ②设置前缀
        String viewPrefix = servletContext.getInitParameter("view-prefix");

        templateResolver.setPrefix(viewPrefix);

        // ③设置后缀
        String viewSuffix = servletContext.getInitParameter("view-suffix");

        templateResolver.setSuffix(viewSuffix);

        // ④设置缓存过期时间(毫秒)
        templateResolver.setCacheTTLMs(60000L);

        // ⑤设置是否缓存
        templateResolver.setCacheable(true);

        // ⑥设置服务器端编码方式
        templateResolver.setCharacterEncoding("utf-8");

        // 4.创建模板引擎对象
        templateEngine = new TemplateEngine();

        // 5.给模板引擎对象设置模板解析器
        templateEngine.setTemplateResolver(templateResolver);

    }

    protected void processTemplate(String templateName, HttpServletRequest req, HttpServletResponse resp) throws IOException {
        // 1.设置响应体内容类型和字符集
        resp.setContentType("text/html;charset=UTF-8");

        // 2.创建WebContext对象
        WebContext webContext = new WebContext(req, resp, getServletContext());

        // 3.处理模板数据
        templateEngine.process(templateName, webContext, resp.getWriter());
    }
}
3、注意:这个类不需要掌握,后面使用框架会被封装起来
4、声明初始化参数
1、xml代码
<!-- 配置 Web 应用初始化参数指定视图前缀、后缀 -->
<!--
    物理视图举例:/WEB-INF/pages/index.html
    对应逻辑视图:index
-->
<context-param>
    <param-name>view-prefix</param-name>
    <param-value>/WEB-INF/pages/</param-value>
</context-param>
<context-param>
    <param-name>view-suffix</param-name>
    <param-value>.html</param-value>
</context-param>
2、位置
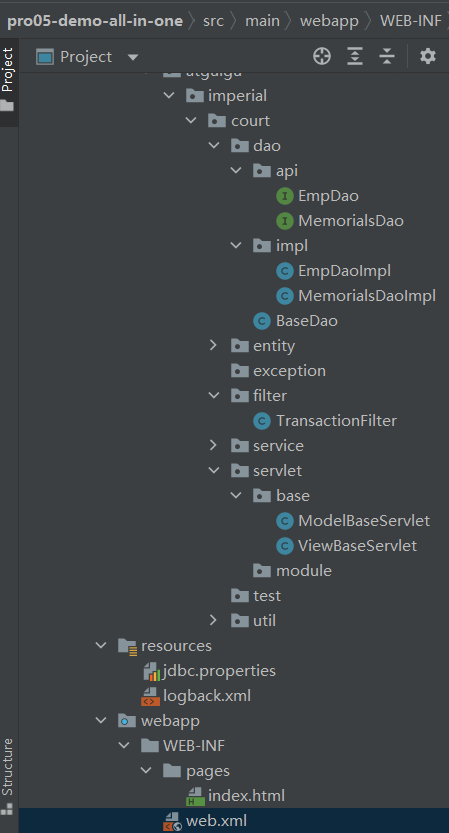
5、Thymeleaf页面的语法
1、http://heavy_code_industry.gitee.io/code_heavy_industry/pro001-javaweb/lecture/chapter08
6.4.2、ModelBaseServlet
1、提出需求
1、需求图
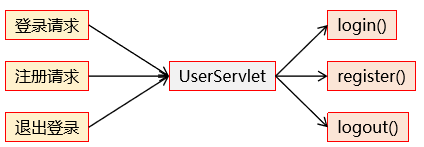
2、HttpServlet的局限
1、doGet():处理GET请求
2、doPost():处理POST请求
3、他们两个方法是分开的
2、解决问题
1、每个请求附带一个请求参数,表明自己要调用的目标方法
2、Servlet 根据目标方法名通过反射调用目标方法
3、ModelBaseServlet完整代码
1、注意
1、为了配合TransactionFilter 实现事务控制,捕获的异常必须抛出
2、
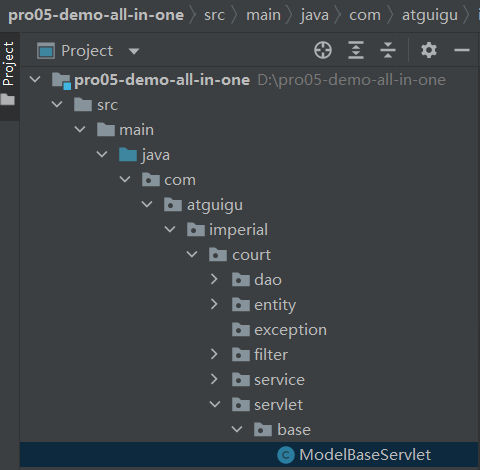
2、代码实现
public class ModelBaseServlet extends ViewBaseServlet {

    protected void doGet(HttpServletRequest request, HttpServletResponse response) throws ServletException, IOException {

        // 在doGet()方法中调用doPost()方法,这样就可以在doPost()方法中集中处理所有请求
        doPost(request, response);
    }

    protected void doPost(HttpServletRequest request, HttpServletResponse response) throws ServletException, IOException {

        // 1.在所有request.getParameter()前面设置解析请求体的字符集
        request.setCharacterEncoding("UTF-8");

        // 2.从请求参数中获取method对应的数据
        String method = request.getParameter("method");

        // 3.通过反射调用method对应的方法
        // ①获取Class对象
        Class<? extends ModelBaseServlet> clazz = this.getClass();

        try {
            // ②获取method对应的Method对象
            Method methodObject = clazz.getDeclaredMethod(method, HttpServletRequest.class, HttpServletResponse.class);

            // ③打开访问权限
            methodObject.setAccessible(true);

            // ④通过Method对象调用目标方法
            methodObject.invoke(this, request, response);
        } catch (Exception e) {
            e.printStackTrace();

            // 重要提醒:为了配合 TransactionFilter 实现事务控制,捕获的异常必须抛出。
            throw new RuntimeException(e);
        }
    }

}
4、继承关系图
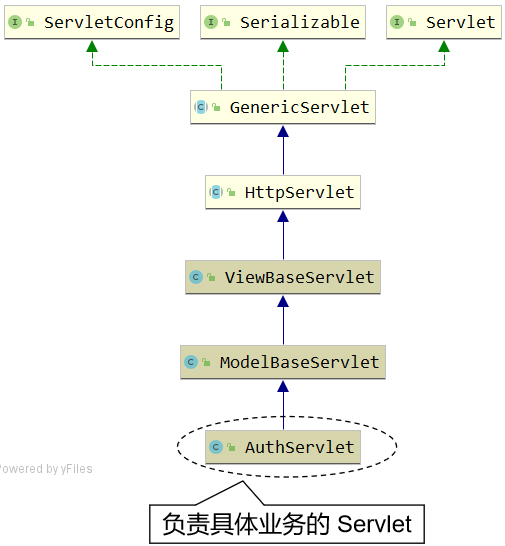
6.5、搭建环境:辅助功能
6.5.1、常量类
1、位置
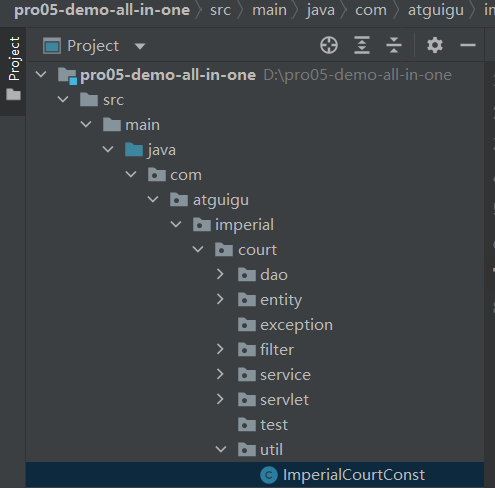
2、代码
public class ImperialCourtConst {

    public static final String LOGIN_FAILED_MESSAGE = "账号、密码错误,不可进宫!";
    public static final String ACCESS_DENIED_MESSAGE = "宫闱禁地,不得擅入!";

}
6.5.2、MD5加密工具方法
1、将明文输入转换成为密文输出
2、位置
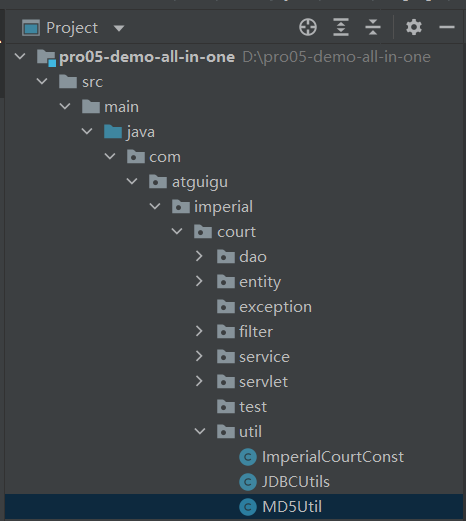
1、代码实现
public class MD5Util {

    /**
     * 针对明文字符串执行MD5加密
     * @param source
     * @return
     */
    public static String encode(String source) {

        // 1.判断明文字符串是否有效
        if (source == null || "".equals(source)) {
            throw new RuntimeException("用于加密的明文不可为空");
        }

        // 2.声明算法名称
        String algorithm = "md5";

        // 3.获取MessageDigest对象
        MessageDigest messageDigest = null;
        try {
            messageDigest = MessageDigest.getInstance(algorithm);
        } catch (NoSuchAlgorithmException e) {
            e.printStackTrace();
        }

        // 4.获取明文字符串对应的字节数组
        byte[] input = source.getBytes();

        // 5.执行加密
        byte[] output = messageDigest.digest(input);

        // 6.创建BigInteger对象
        int signum = 1;
        BigInteger bigInteger = new BigInteger(signum, output);

        // 7.按照16进制将bigInteger的值转换为字符串
        int radix = 16;
        String encoded = bigInteger.toString(radix).toUpperCase();

        return encoded;
    }

}
6.5.3、日志配置文件
1、位置
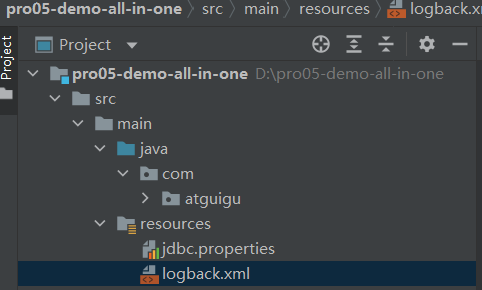
1、代码配置实现
<?xml version="1.0" encoding="UTF-8"?>
<configuration debug="true">
    <!-- 指定日志输出的位置 -->
    <appender name="STDOUT"
              class="ch.qos.logback.core.ConsoleAppender">
        <encoder>
            <!-- 日志输出的格式 -->
            <!-- 按照顺序分别是:时间、日志级别、线程名称、打印日志的类、日志主体内容、换行 -->
            <pattern>[%d{HH:mm:ss.SSS}] [%-5level] [%thread] [%logger] [%msg]%n</pattern>
            <charset>UTF-8</charset>
        </encoder>
    </appender>

    <!-- 设置全局日志级别。日志级别按顺序分别是:DEBUG、INFO、WARN、ERROR -->
    <!-- 指定任何一个日志级别都只打印当前级别和后面级别的日志。 -->
    <root level="INFO">
        <!-- 指定打印日志的appender,这里通过“STDOUT”引用了前面配置的appender -->
        <appender-ref ref="STDOUT" />
    </root>

    <!-- 专门给某一个包指定日志级别 -->
    <logger name="com.atguigu" level="DEBUG" additivity="false">
        <appender-ref ref="STDOUT" />
    </logger>

</configuration>
6.6、业务功能:
6.6.1、显示首页
1、流程图
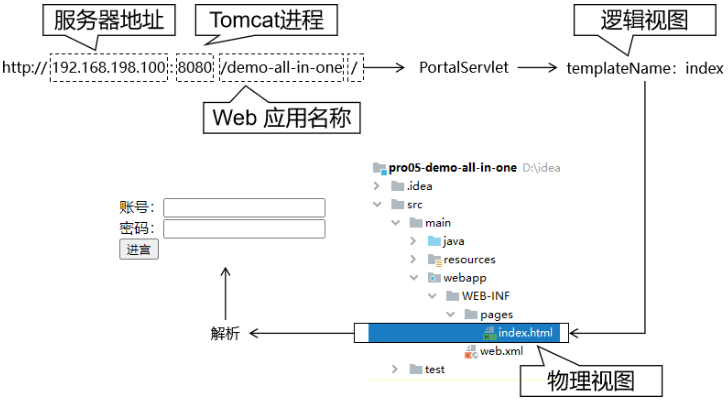
2、创建PortalServlet
1、位置
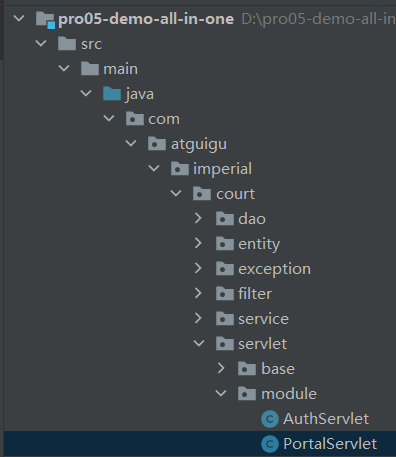
1、代码实现
package com.atguigu.imperial.court.servlet.module;

import com.atguigu.imperial.court.servlet.base.ViewBaseServlet;
import javax.servlet.ServletException;
import javax.servlet.http.HttpServletRequest;
import javax.servlet.http.HttpServletResponse;
import java.io.IOException;
public class PortalServlet  extends ViewBaseServlet {
    @Override
    protected void doGet(HttpServletRequest req, HttpServletResponse resp) throws ServletException, IOException {
        doPost(req, resp);
    }
    @Override
    protected void doPost(HttpServletRequest req, HttpServletResponse resp) throws ServletException, IOException {
        //声明要访问的首页的逻辑视图
        String templateName = "index";

        //调用父类的方法根据逻辑视图名称渲染视图
        processTemplate(templateName,req,resp);
    }
}
3、在index.html编写登录表单
1、图示
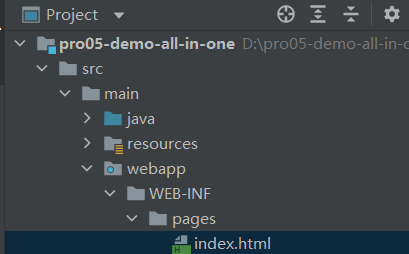
2、代码实现
<!DOCTYPE html>
<html lang="en" xml:th="http://www.thymeleaf.org">
<head>
    <meta charset="UTF-8">
    <title>Title</title>
</head>
<body>
<!-- @{/auth} 解析后:/demo/auth -->
<form th:action="@{/auth}" method="post">
    <!-- 传递 method 请求参数,目的是为了让当前请求调用 AuthServlet 中的 login() 方法 -->
    <input type="hidden" name="method" value="login" />
    <!-- th:text 解析表达式后会替换标签体 -->
    <!-- ${attrName} 从请求域获取属性名为 attrName 的属性值 -->
    <p style="color: red;font-weight: bold;" th:text="${message}"></p>
    <p style="color: red;font-weight: bold;" th:text="${systemMessage}"></p>

    账号:<input type="text" name="loginAccount"/><br/>
    密码:<input type="password" name="loginPassword"><br/>
    <button type="submit">进宫</button>
</form>
</body>
</html>
6.6.2、登录操作
1、流程图
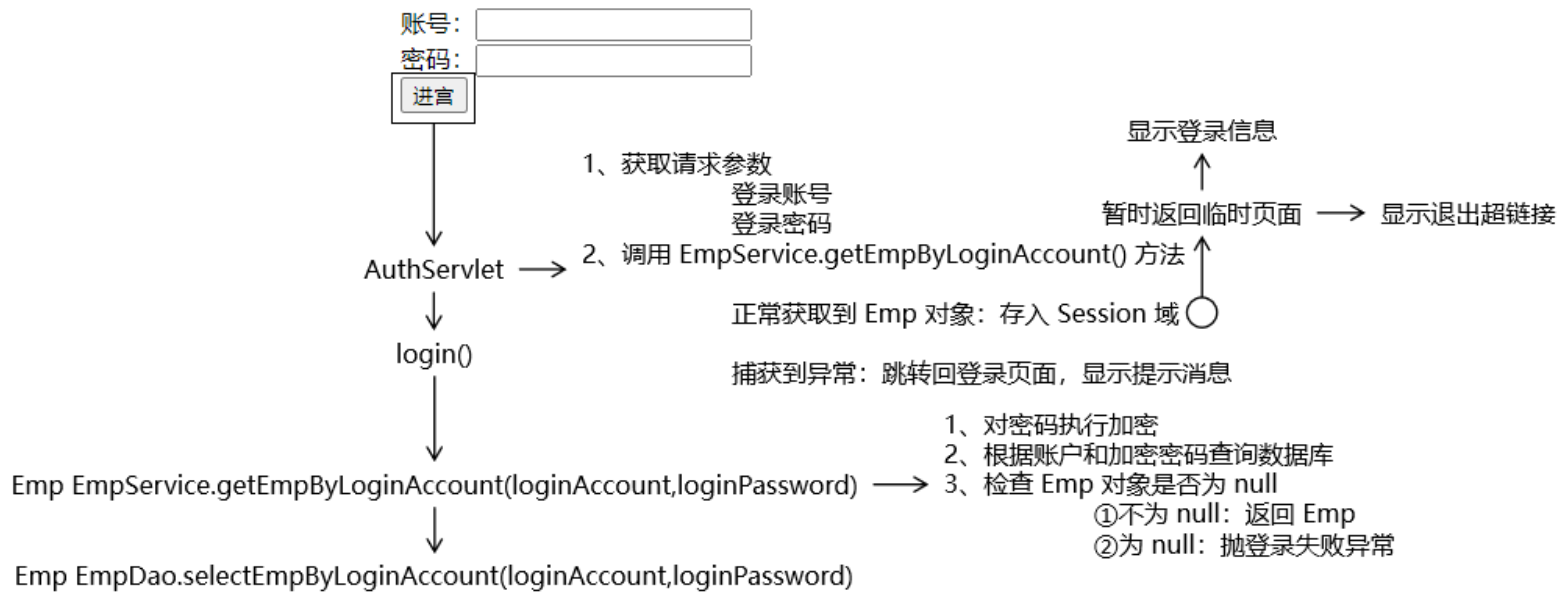
2、创建EmpService
1、图
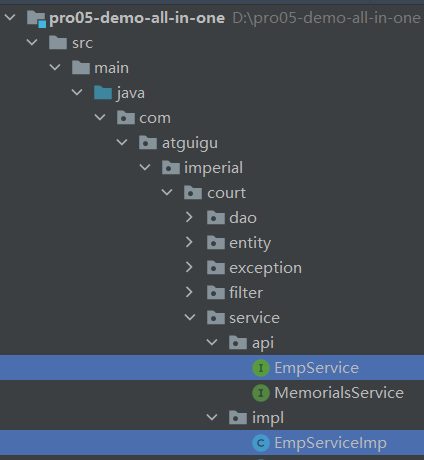
3、创建登录失败异常
1、图
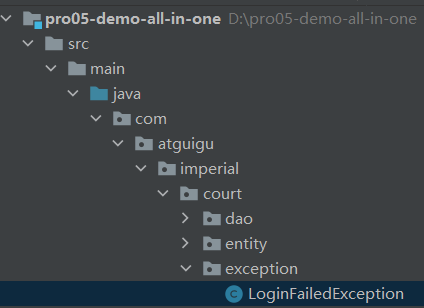
2、代码实现
package com.atguigu.imperial.court.exception;
public class LoginFailedException  extends RuntimeException{
    public LoginFailedException() {
    }
    public LoginFailedException(String message) {
        super(message);
    }
    public LoginFailedException(String message, Throwable cause) {
        super(message, cause);
    }
    public LoginFailedException(Throwable cause) {
        super(cause);
    }
    public LoginFailedException(String message, Throwable cause, boolean enableSuppression, boolean writableStackTrace) {
        super(message, cause, enableSuppression, writableStackTrace);
    }
}
4、增加常量声明
1、图
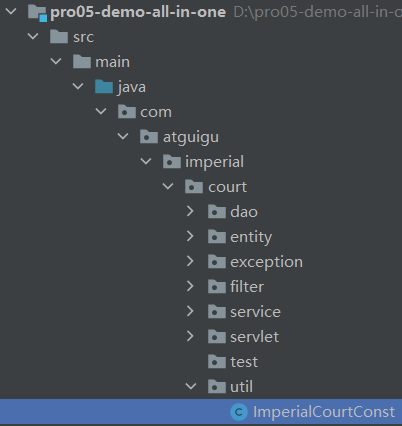
2、代码实现
package com.atguigu.imperial.court.util;
public class ImperialCourtConst {

    public static final String LOGIN_FAILED_MESSAGE = "账号,密码错误,不可进宫";
    public static final String ACCESS_DENIED_MESSAGE = "宫围禁地,不得擅入!";
    public static final String LOGIN_EMP_ATTR_NAME = "loginInfo";
}
5、创建AuthSerVlet
1、创建java类
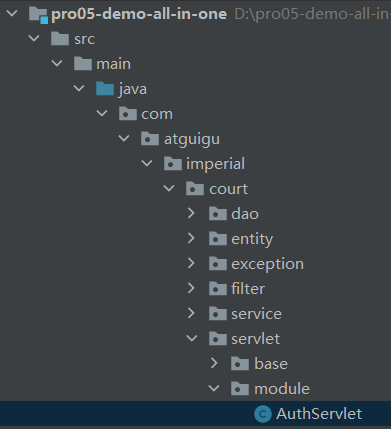
2
6.7、显示奏折列表
6.7.1、流程图
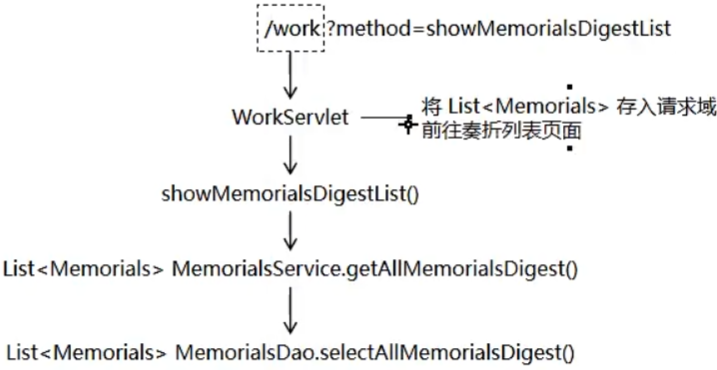
6.7.2、创建组件
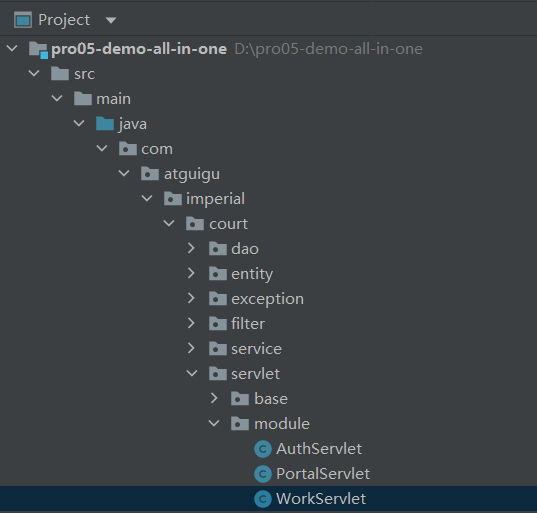
1、创建WorkServlet
1、创建java类
1、刚开始是空的没有写方法
public class MemorialsServiceImp implements MemorialsService {
    private MemorialsDao memorialsDao = new MemorialsDaoImpl();
}
2、注册
<!--    配置WorkServlet-->
    <servlet>
        <servlet-name>workServlet</servlet-name>
        <servlet-class>com.atguigu.imperial.court.servlet.module.WorkServlet</servlet-class>
    </servlet>
    <servlet-mapping>
        <servlet-name>workServlet</servlet-name>
        <url-pattern>/work</url-pattern>
    </servlet-mapping>
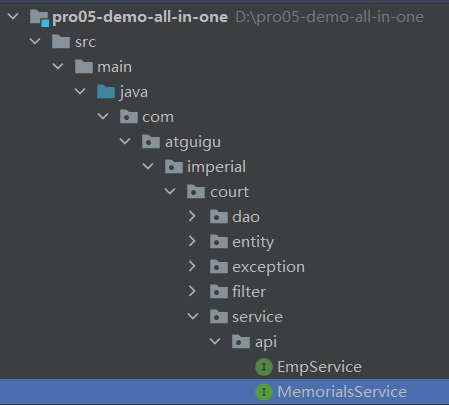
1、创建MemorialsService接口
1、
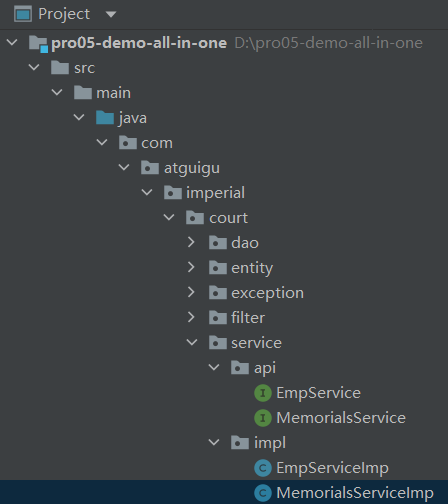
2、创建MemorialsService实现类
1、
2、代码
public class MemorialsServiceImp implements MemorialsService {
    private MemorialsDao memorialsDao = new MemorialsDaoImpl();
}
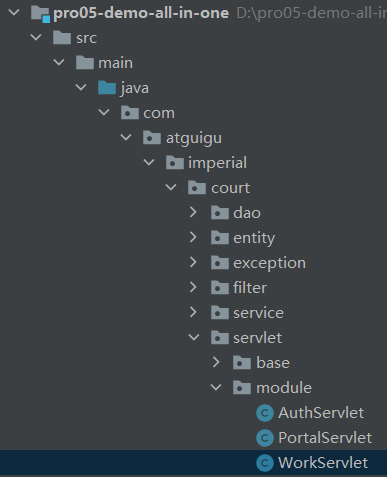
3、WorkServlet方法
1、位置
1、代码实现
protected void showMemorialsDigestList(HttpServletRequest request, HttpServletResponse response) throws ServletException, IOException {

    // 1、调用 Service 方法查询数据
    List<Memorials> memorialsList = memorialsService.getAllMemorialsDigest();

    // 2、将查询得到的数据存入请求域
    request.setAttribute("memorialsList", memorialsList);

    // 3、渲染视图
    String templateName = "memorials-list";
    processTemplate(templateName, request, response);
}
4、MemorialsService方法
1、位置
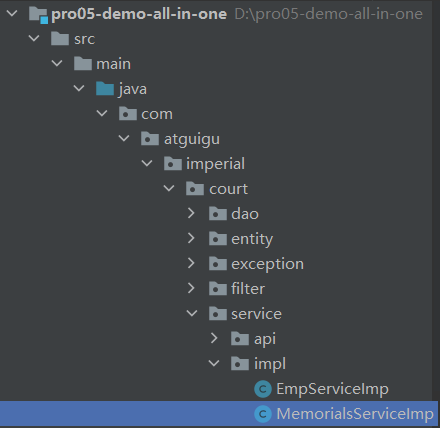
1、代码实现
package com.atguigu.imperial.court.service.impl;

import com.atguigu.imperial.court.dao.api.MemorialsDao;
import com.atguigu.imperial.court.dao.impl.MemorialsDaoImpl;
import com.atguigu.imperial.court.entity.Memorials;
import com.atguigu.imperial.court.service.api.MemorialsService;

import java.util.List;

public class MemorialsServiceImp implements MemorialsService {
    private MemorialsDao memorialsDao = new MemorialsDaoImpl();

    @Override
    public List<Memorials> getAllMemorialsDigest() {
        return memorialsDao.selectAllMemorialsDigest();
    }
}
5、MemorialsDao方法
1、位置
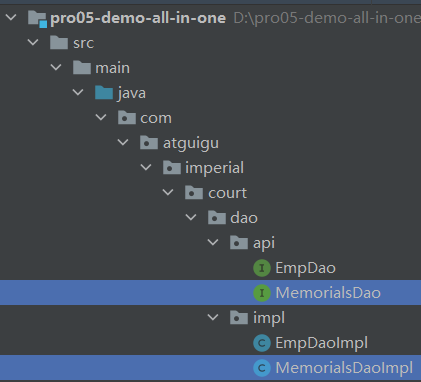
1。代码实现
package com.atguigu.imperial.court.dao.impl;

import com.atguigu.imperial.court.dao.BaseDao;
import com.atguigu.imperial.court.dao.api.MemorialsDao;
import com.atguigu.imperial.court.entity.Memorials;

import java.util.List;

public class MemorialsDaoImpl extends BaseDao<Memorials> implements MemorialsDao {
    @Override
    public List<Memorials> selectAllMemorialsDigest() {

        String sql = "select memorials_id as memorialsId,\n" +
                "       memorials_title as memorialsTitle,\n" +
                "       concat(left(memorials_content,10),\"...\") as memorialsContentDigest,\n" +
                "       emp_name as memorialsEmpName,\n" +
                "       memorials_create_time as memorialsCreateTime,\n" +
                "       memorials_status as memorialsStatus\n" +
                "from t_memorials as m left join t_emp as e on m.memorials_emp=e.emp_id;";

        return getBeanList(sql, Memorials.class);
    }
}
6、页面显示
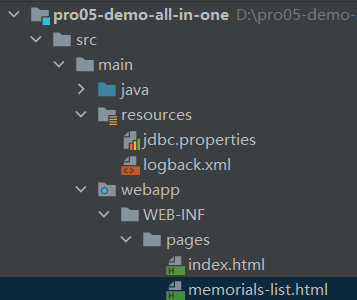
1、页面样式声明
<style type="text/css">
    table {
        border-collapse: collapse;
        margin: 0px auto 0px auto;
    }

    table th, td {
        border: 1px solid black;
        text-align: center;
    }

    div {
        text-align: right;
    }
</style>
2、用户登录信息部分
<!-- 登录信息部分 -->
<div>
    <span th:if="${session.loginInfo.empPosition == 'emperor'}">恭请皇上圣安</span>
    <span th:if="${session.loginInfo.empPosition == 'minister'}">给<span th:text="${session.loginInfo.empName}">XXX</span>大人请安</span>
    <a th:href="@{/auth?method=logout}">退朝</a>
</div>
3、数据展示信息部分
<!-- 数据显示部分 -->
<table>
    <thead>
        <tr>
            <th>奏折标题</th>
            <th>内容摘要</th>
            <th>上疏大臣</th>
            <th>上疏时间</th>
            <th>奏折状态</th>
            <th>奏折详情</th>
        </tr>
    </thead>
    <tbody th:if="${#lists.isEmpty(memorialsList)}">
        <tr>
            <td colspan="6">没有人上过折子</td>
        </tr>
    </tbody>
    <tbody th:if="${not #lists.isEmpty(memorialsList)}">
        <tr th:each="memorials : ${memorialsList}">
            <td th:switch="${memorials.memorialsStatus}">
                <span th:text="${memorials.memorialsTitle}" th:case="0" style="color: red;">奏折标题</span>
                <span th:text="${memorials.memorialsTitle}" th:case="1" style="color: blue;">奏折标题</span>
                <span th:text="${memorials.memorialsTitle}" th:case="2">奏折标题</span>
            </td>
            <td th:switch="${memorials.memorialsStatus}">
                <span th:text="${memorials.memorialsContentDigest}" th:case="0" style="color: red;">内容摘要</span>
                <span th:text="${memorials.memorialsContentDigest}" th:case="1" style="color: blue;">内容摘要</span>
                <span th:text="${memorials.memorialsContentDigest}" th:case="2">内容摘要</span>
            </td>
            <td th:switch="${memorials.memorialsStatus}">
                <span th:text="${memorials.memorialsEmpName}" th:case="0" style="color: red;">上疏大臣</span>
                <span th:text="${memorials.memorialsEmpName}" th:case="1" style="color: blue;">上疏大臣</span>
                <span th:text="${memorials.memorialsEmpName}" th:case="2">上疏大臣</span>
            </td>
            <td th:switch="${memorials.memorialsStatus}">
                <span th:text="${memorials.memorialsCreateTime}" th:case="0" style="color: red;">上疏时间</span>
                <span th:text="${memorials.memorialsCreateTime}" th:case="1" style="color: blue;">上疏时间</span>
                <span th:text="${memorials.memorialsCreateTime}" th:case="2">上疏时间</span>
            </td>
            <td th:switch="${memorials.memorialsStatus}">
                <span th:case="0" style="color: red;">未读</span>
                <span th:case="1" style="color: blue;">已读</span>
                <span th:case="2">已批示</span>
            </td>

            <td>
                <a th:href="@{/work?method=detail}">奏折详情</a>
            </td>
        </tr>
    </tbody>
</table>
7、和登录成功对接
1、位置
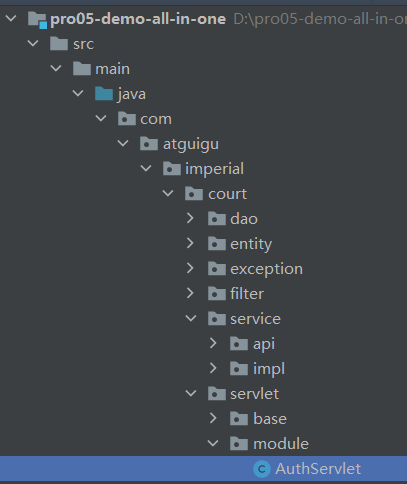
2、代码实现
protected void login(
        HttpServletRequest request,
        HttpServletResponse response)
        throws ServletException, IOException {

    try {
        // 1、获取请求参数
        String loginAccount = request.getParameter("loginAccount");
        String loginPassword = request.getParameter("loginPassword");

        // 2、调用 EmpService 方法执行登录逻辑
        Emp emp = empService.getEmpByLoginAccount(loginAccount, loginPassword);

        // 3、通过 request 获取 HttpSession 对象
        HttpSession session = request.getSession();

        // 4、将查询到的 Emp 对象存入 Session 域
        session.setAttribute(ImperialCourtConst.LOGIN_EMP_ATTR_NAME, emp);

        // 5、前往指定页面视图
        // 前往临时页面
        // String templateName = "temp";
        // processTemplate(templateName, request, response);

        // 前往正式的目标地址
        response.sendRedirect(request.getContextPath() + "/work?method=showMemorialsDigestList");

    } catch (Exception e) {
        e.printStackTrace();

        // 6、判断此处捕获到的异常是否是登录失败异常
        if (e instanceof LoginFailedException) {
            // 7、如果是登录失败异常则跳转回登录页面
            // ①将异常信息存入请求域
            request.setAttribute("message", e.getMessage());

            // ②处理视图:index
            processTemplate("index", request, response);

        }else {
            // 8、如果不是登录异常则封装为运行时异常继续抛出
            throw new RuntimeException(e);

        }

    }

}
6.8、业务功能:显示奏折详情
6.8.1、流程图
1、图例
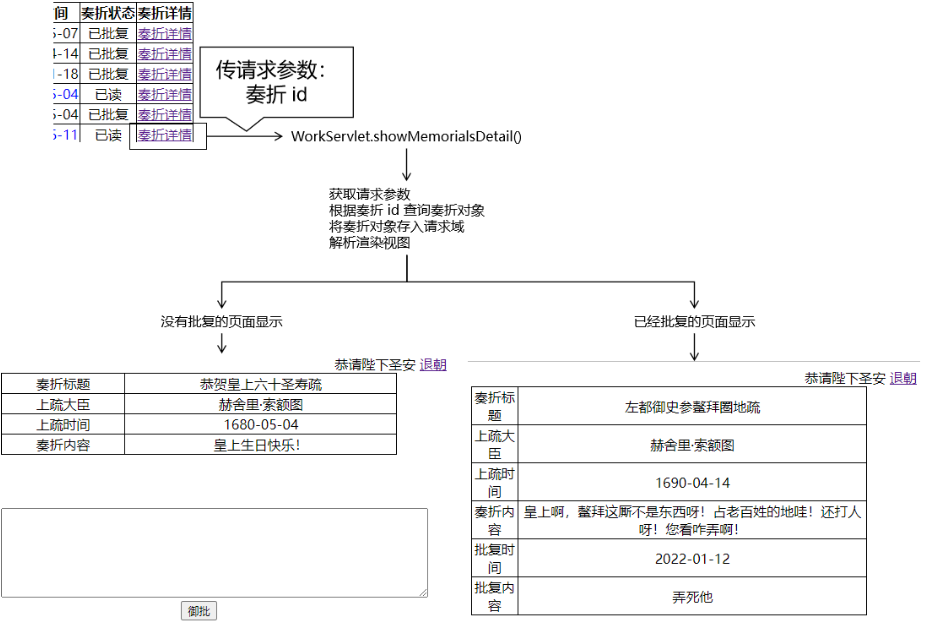
6.8.2、调整奏折列表页面的超链接
<td>
        <a th:href="@{/work(method='showMemorialsDetail',memorialsId=${memorials.memorialsId})}">奏折详情</a>
</td>
6.8.3、WorkServlet方法
1、位置
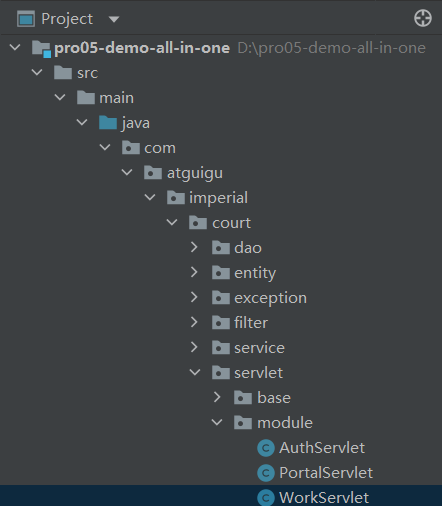
2、代码实现
protected void showMemorialsDetail(
        HttpServletRequest request,
        HttpServletResponse response)
        throws ServletException, IOException {

    // 1、从请求参数读取 memorialsId
    String memorialsId = request.getParameter("memorialsId");

    // 2、根据 memorialsId 从 Service 中查询 Memorials 对象
    Memorials memorials = memorialsService.getMemorialsDetailById(memorialsId);

    // 3、将 Memorials 对象存入请求域
    request.setAttribute("memorials", memorials);

    // 4、解析渲染视图
    String templateName = "memorials_detail";
    processTemplate(templateName, request, response);

}
6.8.4、MemorialsService方法
1、位置
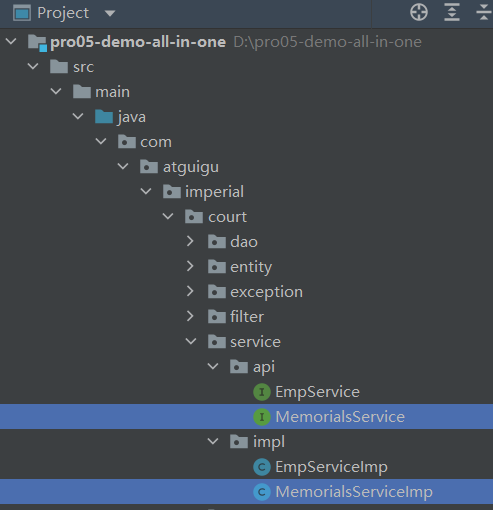
2、代码实现
@Override
public Memorials getMemorialsDetailById(String memorialsId) {
    return memorialsDao.selectMemorialsById(memorialsId);
}
6.8.5、MemorialsDao方法
1、位置
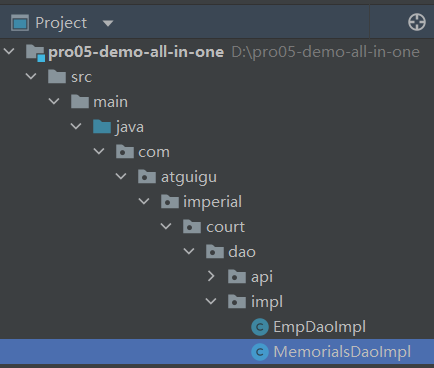
2、代码实现
    @Override
    public Memorials selectMemorialsById(String memorialsId) {

        String sql = "select memorials_id memorialsId,\n" +
                "       memorials_title memorialsTitle,\n" +
                "       memorials_content memorialsContent,\n" +
                "       emp_name memorialsEmpName,\n" +
                "       memorials_create_time memorialsCreateTime,\n" +
                "       memorials_status memorialsStatus,\n" +
                "       feedback_time feedbackTime,\n" +
                "       feedback_content feedbackContent\n" +
                "from t_memorials m left join  t_emp e on m.memorials_emp=e.emp_id " +
                "where memorials_id=?;";

        return getSingleBean(sql, Memorials.class, memorialsId);
    }
6.8.6、详情页
1、位置
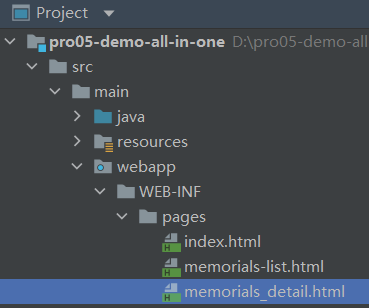
2、代码实现
<!-- 登录信息部分 -->
<div>
    <span th:if="${session.loginInfo.empPosition == 'emperor'}">恭请皇上圣安</span>
    <span th:if="${session.loginInfo.empPosition == 'minister'}">给<span th:text="${session.loginInfo.empName}">XXX</span>大人请安</span>
    <a th:href="@{/auth?method=logout}">退朝</a>
</div>

<table>
    <tr>
        <td>奏折标题</td>
        <td th:text="${memorials.memorialsTitle}"></td>
    </tr>
    <tr>
        <td>上疏大臣</td>
        <td th:text="${memorials.memorialsEmpName}"></td>
    </tr>
    <tr>
        <td>上疏时间</td>
        <td th:text="${memorials.memorialsCreateTime}"></td>
    </tr>
    <tr>
        <td>奏折内容</td>
        <td th:text="${memorials.memorialsContent}"></td>
    </tr>
    <tr th:if="${memorials.memorialsStatus == 2}">
        <td>批复时间</td>
        <td th:text="${memorials.feedbackTime}"></td>
    </tr>
    <tr th:if="${memorials.memorialsStatus == 2}">
        <td>批复内容</td>
        <td th:text="${memorials.feedbackContent}"></td>
    </tr>
</table>

<div style="margin:0 auto 0 auto;width: 60%; " th:if="${memorials.memorialsStatus != 2}">
    <form th:action="@{/work}" method="post">

        <input type="hidden" name="method" value="feedBack" />
        <input type="hidden" name="memorialsId" th:value="${memorials.memorialsId}"/>

        <textarea style="width: 500px;height: 200px;" name="feedbackContent"></textarea>

        <button type="submit">御批</button>

    </form>
</div>

<a th:href="@{/work?method=showMemorialsDigestList}">返回列表</a>
6.8.7、更新状态
1、业务逻辑规则
1、就是把未读,点击查看后,需要从未读变成已读。
2、WorkServlet方法
1、位置
2、代码实现
1、增加判断:
protected void showMemorialsDetail(
            HttpServletRequest request,
            HttpServletResponse response)
            throws ServletException, IOException {

        // 1、从请求参数读取 memorialsId
        String memorialsId = request.getParameter("memorialsId");

        // 2、根据 memorialsId 从 Service 中查询 Memorials 对象
        Memorials memorials = memorialsService.getMemorialsDetailById(memorialsId);

        //补充功能
        //获取当前奏折状态
        Integer memorialsStatus = memorials.getMemorialsStatus();
        //判断奏折状态
        if(memorialsStatus==0){
            ///更新奏折状态,数据库修改
            memorialsService.updateMemorialsStatusToRead(memorialsId);
            ////更新奏折状态,当前对象修改
            memorials.setMemorialsStatus(1);
        }

        // 3、将 Memorials 对象存入请求域
        request.setAttribute("memorials", memorials);

        // 4、解析渲染视图
        String templateName = "memorials_detail";
        processTemplate(templateName, request, response);

    }
3、MemorialsService方法
1、位置
2、代码实现
@Override
public void updateMemorialsStatusToRead(String memorialsId) {
    memorialsDao.updateMemorialsStatusToRead(memorialsId);
}
4、MemorialsDao方法
1、位置
2、代码实现
@Override
public void updateMemorialsStatusToRead(String memorialsId) {
    String sql = "update t_memorials set memorials_status=1 where memorials_id=?";
    update(sql, memorialsId);
}
6.9、批复奏折
1、本质
1、提交表单,更新数据
2、WorkServlet 方法
    protected void feedBack(HttpServletRequest request, HttpServletResponse response) throws ServletException, IOException {
//        1、从请求参数读取
        String memorialsId = request.getParameter("memorialsId");
        String feedbackContent = request.getParameter("feedbackContent");
//        2、执行更新
        memorialsService.updateMemorialsFeedBack(memorialsId,feedbackContent);

//        重定向回到更新页面
        response.sendRedirect(request.getContextPath()+"/work?method=showMemorialsDigestList");
    }
3、MemorialsService方法
    @Override
    public void updateMemorialsFeedBack(String memorialsId, String feedbackContent) {
        memorialsDao.updateMemorialsFeedBack(memorialsId,feedbackContent);
    }
4、MemorialsDao方法
@Override
public void updateMemorialsFeedBack(String memorialsId, String feedbackContent) {
    String feedbackTime = new SimpleDateFormat("yyyy-MM-dd").format(new Date());

    String sql = "update t_memorials set memorials_status =2,feedback_content=?,feedback_time=? where memorials_id=?";
    update(sql,feedbackContent,feedbackTime,memorialsId);
}
6.10、业务功能:登录检查
1、流程图
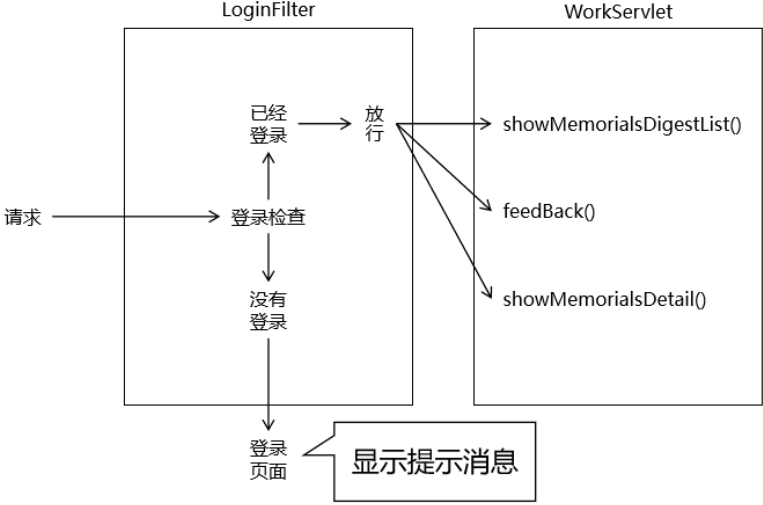
2、创建LoginFilter
1、创建Java类
1、位置
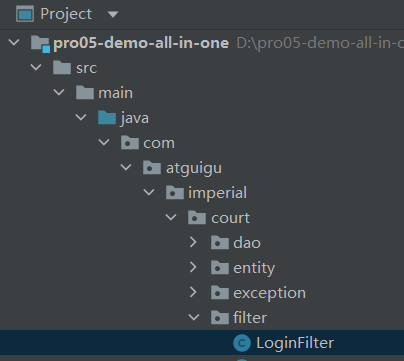
2、代码实现
package com.atguigu.imperial.court.filter;

import com.atguigu.imperial.court.util.ImperialCourtConst;

import javax.servlet.*;
import javax.servlet.http.HttpServletRequest;
import javax.servlet.http.HttpSession;
import java.io.IOException;

public class LoginFilter implements Filter {
    @Override
    public void init(FilterConfig filterConfig) throws ServletException {
    }

    @Override
    public void doFilter(ServletRequest servletRequest, ServletResponse servletResponse, FilterChain filterChain) throws IOException, ServletException {
//        1、获取HttpSession对象
        HttpServletRequest request = (HttpServletRequest) servletRequest;

        HttpSession session = request.getSession();

//        2、尝试从Session域获取已登录的对象
        Object loginEmp = session.getAttribute(ImperialCourtConst.LOGIN_EMP_ATTR_NAME);

//        3、判断loginEmp是否为空
        if(loginEmp!=null){
//        4、    不为空,就让行
            filterChain.doFilter(request,servletResponse);
            return;
        }
//        5、若为空,说明登录失败,回到登录页面
        request.setAttribute("systemMessage",ImperialCourtConst.ACCESS_DENIED_MESSAGE);
        request.getRequestDispatcher("/").forward(request,servletResponse);
    }

    @Override
    public void destroy() {
    }
}
2、注册
1、位置
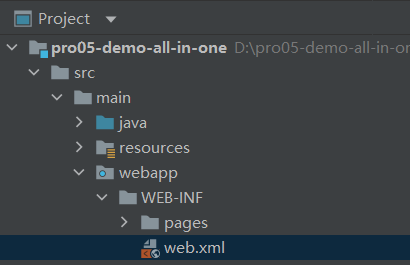
2、代码实现
1、把 LoginFilter 放在 TransactionFilter 前面声明
2、原因:如果登录检查失败不放行,直接跳转到页面,此时将不必执行 TransactionFilter 中的事务操作,可以节约性能
3、
<!--登录的Filter-->
    <filter>
        <filter-name>loginFilter</filter-name>
        <filter-class>com.atguigu.imperial.court.filter.LoginFilter</filter-class>
    </filter>
    <filter-mapping>
        <filter-name>loginFilter</filter-name>
        <url-pattern>/work</url-pattern>
    </filter-mapping>
<!--    事务的Filter-->
    <filter>
        <filter-name>txFilter</filter-name>
        <filter-class>com.atguigu.imperial.court.filter.TransactionFilter</filter-class>
    </filter>
    <filter-mapping>
        <filter-name>txFilter</filter-name>
        <url-pattern>/*</url-pattern>
    </filter-mapping>
6.11、打包部署
1、适配部署环境
1、MySQL 连接信息中,IP 地址部分需要改成 localhost。
1、位置
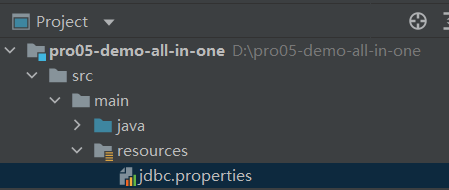
2、代码
url=jdbc:mysql://localhost:3306/db_imperial_court2、跳过测试打包
1、maven控制台输入
1、位置
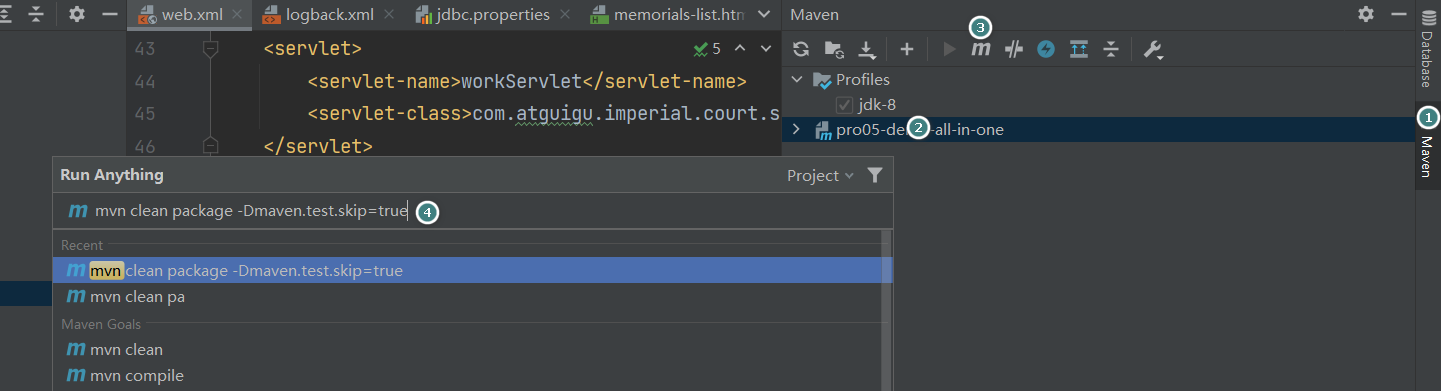
2、代码
mvn clean package -Dmaven.test.skip=true2、在xml可以指定war包的名称
    <!-- 对构建过程进行自己的定制 -->
    <build>
        <!-- 当前工程在构建过程中使用的最终名称 -->
        <finalName>demo-me</finalName>
    </build>
3、最终打包的war包